جستجو، فیلتر و گروهبندی رکوردها
Odoo allows for the searching, filtering, and grouping of records in a view to display only the most relevant records. The search bar is located at the top of the view, start typing to search for values, or click the 🔽 (down arrow) icon to access the Filter, Group By, and Favorites drop-down menus.
جستجوی مقادیر
Use the search field to quickly look for specific values, and add them as a filter. Type the value to search for, and select the desired option from the drop-down menu to apply the search filter.
Example
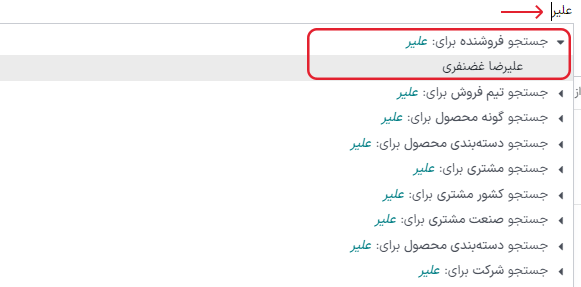
Instead of adding a custom filter to select records where
Mitchell Admin is the salesperson on the Sales Analysis report (), search for Mitch, and click the ⏵ (right arrow) next to
Search Salesperson for: Mitch, and select Mitchell Admin.
توجه
Using the search field is equivalent to using the contains operator when adding a custom filter. If a partial value is entered, and the desired field is directly selected (without selecting the ⏵ (right arrow)), all records containing the typed characters for the selected field are included.
فیلترها
فیلترها برای انتخاب رکوردهایی که معیارهای خاصی را برآورده میکنند استفاده میشوند. رکوردهای پیشفرض انتخاب شده در هر نما متفاوت است، اما میتوان با انتخاب یک (یا چند) فیلتر از پیش پیکربندی شده یا با اضافه کردن فیلتر سفارشی آن را تغییر داد.
فیلترهای پیشساخته
Modify the default selection of records by clicking the 🔽 (down arrow) icon from the search bar, and selecting one (or several) preconfigured filters from the Filters drop-down menu.
Example
در گزارش تحلیل فروش ()، به صورت پیشفرض فقط رکوردهایی که در مرحله سفارش فروش هستند و تاریخ سفارش آنها در 365 روز گذشته است انتخاب میشوند.
برای شامل کردن رکوردهای مرحله پیشفاکتور نیز، پیشفاکتورها را از فیلترها انتخاب کنید.
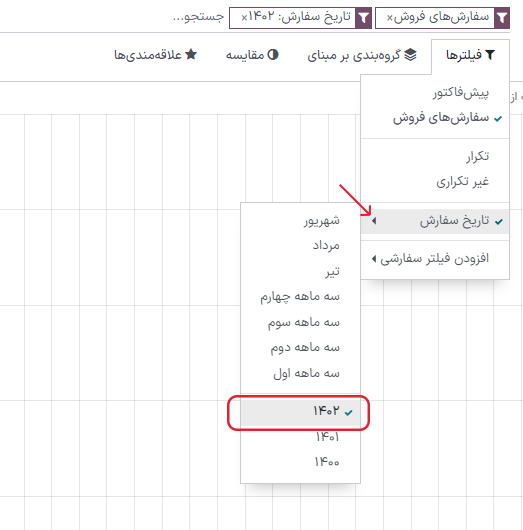
Furthermore, to only include sales order and quotation records from a specific year, like
2024, for example, first remove the existing Order Date: Last 365 Days filter, by clicking the
❌ (remove) icon, then select .
توجه
فیلترهای از پیش پیکربندی شده گروهبندی شدهاند و هر گروه با یک خط افقی از هم جدا شده است. انتخاب فیلترهایی که در داخل یک گروه هستند، امکان میدهد رکوردهایی که با هر یک از شرایط اعمال شده مطابقت دارند نمایش داده شوند. ولی اگر فیلترها از گروههای مختلفی انتخاب شوند، رکوردها باید با همه شرایط اعمال شده مطابقت داشته باشند.
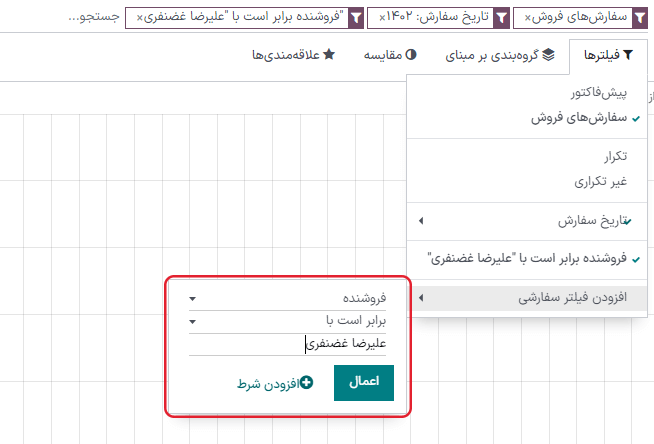
فیلترهای سفارشی
If the preconfigured filters are not specific enough, add a custom filter. To do so, click the 🔽 (down arrow) icon in the search bar, then select .
پنجره پاپآپ افزودن فیلتر سفارشی حاوی گزینههای تطبیق، قانون فیلتر و یک دکمه برای شامل کردن بایگانیها است.
پیکربندی پیشفرض تطبیق به صورت مطابقت هر کدام از قوانین زیر است، که یعنی هر قانون به صورت مستقل اعمال میشود. برای تغییر پیکربندی تطبیق به مطابقت همه قوانین زیر، باید حداقل دو قانون فیلتر به فیلتر سفارشی اضافه شوند.
Match all 🔽 of the following rules: all of the filter rules must be met. Logically, this is an AND (
&) operation.Match any 🔽 of the following rules: any of the filter rules can be met. Logically, this is an OR (
|) operation.
به طور پیشفرض، یک قانون به فیلتر سفارشی اضافه شده است. در ادامه ساختار هر قانون فیلتر توضیح داده شده است:
The first inline field is the field name to filter by. Some fields have refined parameters that are nested within another field. These fields have an > (arrow) icon beside them, which can be selected to reveal the nested fields.
دومین فیلد داخلی، عملگر شرطی است که برای مقایسه نام فیلد با مقدار استفاده میشود. عملگرهای شرطی موجودی بسته به نوع داده فیلد متفاوت هستند.
سومین فیلد داخلی مقدار متغیر نام فیلد است که با توجه به عملگر مورد استفاده و نوع داده، میتواند بهصورت یک منوی کشویی، ورودی متنی، ورودی عددی، ورودی تاریخ/زمان، انتخابکننده بولی یا خالی باشد.
سه دکمه داخلی نیز در سمت چپ معیارهای فیلتر قانون در دسترس هستند:
➕ (plus sign): adds a new rule below the existing rule.
(Add branch): adds a new group of rules below the existing rule, with the any and all matching options available to define how each rule within this branch is applied to the filter. If the matching option is set to the same as the parent group, the fields are moved to join the parent group.
Example
If the matching option is set to Match all 🔽 of the following rules, and a new branch is added with its matching option changed from any 🔽 of to all 🔽 of, the newly-added branch disappears, and its group of rules are moved to the parent group.
🗑️ (garbage can): deletes the node. If a branch node is deleted, all children of that node are deleted, as well.
با کلیک بر روی دکمه قانون جدید میتوان یک قانون فیلتر جدید به فیلتر سفارشی اضافه کرد.
پس از تعریف معیارهای فیلتر، روی افزودن کلیک کنید تا فیلتر سفارشی به نمای نمایش داده شده اضافه شود.
Example
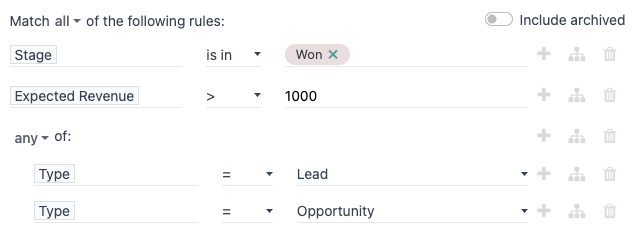
برای هدف قرار دادن تمام سرنخها و فرصتهای موجود در برنامه که در مرحله برنده شده هستند و درآمد مورد انتظار آنها بیشتر از 100000 تومان است، باید موارد زیر وارد شوند:
Match all 🔽 (down arrow) of the following rules:
مرحله در برنده شده
درآمد مورد انتظار >
1000000any 🔽 (down arrow) of:
نوع = سرنخ
نوع = فرصت
نکته
حالت توسعهدهنده را فعال کنید تا نام فنی و نوع داده هر فیلد را مشاهده کنید، همچنین میتوانید در قسمت متنی # ویرایشگر کد در قوانین فیلتر، دامنه را بهصورت دستی مشاهده و ویرایش کنید.
گروهبندی رکوردها
The display of records in a view can be clustered together, according to one of the preconfigured groups. To do so, click the 🔽 (down arrow) icon in the search bar, then select one of the Group By options from the drop-down menu.
Example
برای گروهبندی رکوردها بر اساس فروشنده در گزارش تحلیل فروش ()، گزینه فروشنده را از منوی کشویی گروهبندی بر مبنای انتخاب کنید. نما تغییر کرده و رکوردها بر اساس فروشنده گروهبندی میشوند، بدون اینکه رکوردی فیلتر شود.

میتوان گروهها را با استفاده از یک فیلد موجود در مدل سفارشیسازی کرد. برای این کار، روی کلیک کنید و یک فیلد را از منوی کشویی انتخاب کنید.
توجه
میتوان همزمان از چند گروه استفاده کرد. گروه اولی که انتخاب میشود، خوشه اصلی است و گروههای بعدی که اضافه میشوند، دستهبندی گروه اصلی را بیشتر تقسیمبندی میکنند. همچنین، میتوان برای بهینهسازی نما، فیلترها و گروهها را همزمان استفاده کرد.
مقایسه
Certain reporting dashboards include a Comparison section in the drop-down menus of their Search... bars. This includes the Overall Equipment Effectiveness report for the Manufacturing app, and the Purchase report for the Purchase app, among others.
The options in the :icon:`fa-adjust` Comparison section are used to compare data from two different time periods. There are two comparison options to choose from: (Time Filter): Previous Period and (Time Filter): Previous Year.
مهم
For some reports, the Comparison section only appears in the Search... bar drop-down menu if one (or more) time periods have been selected in the Filters column. This is because, if no time period is specified, there is nothing to compare.
Additionally, some reports only allow use of the Comparison feature when the :icon:`fa-pie-chart` (pie chart) graph type, or the :icon:`oi-view-pivot` (pivot) view, is selected. A Comparison option can be selected even if another view is enabled, but doing so does not change the way data is displayed on the report.
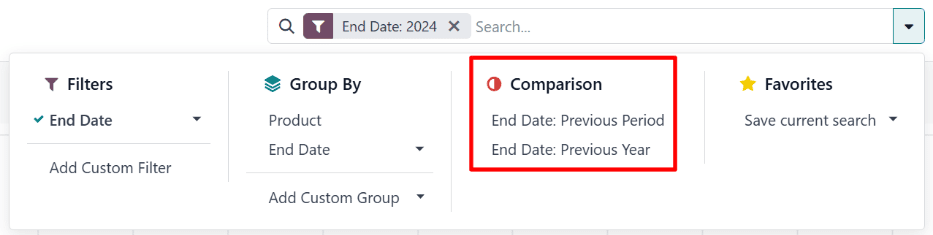
To view data using one of the two comparisons, begin by selecting a time period in the Filters column of the Search... bar drop-down menu. Then, select either (Time Filter): Previous Period or (Time Filter): Previous Year in the Comparison section.
با فعال بودن یکی از گزینههای مقایسه، گزارش حاصل، دادههای دوره انتخابی را با دادههای همان واحد زمانی (ماه، فصل، سال) در دوره یا سال قبل مقایسه میکند. نحوه نمایش دادهها بستگی به نمای انتخاب شده دارد:
The :icon:`fa-bar-chart` (bar chart) shows two bars, side-by-side, for each unit of time for the selected time period. The left bar represents the selected time period, while the right bar represents the previous time period.
The :icon:`fa-line-chart` (line chart) is displayed with two lines, one representing the selected time period, and the other representing the previous time period.
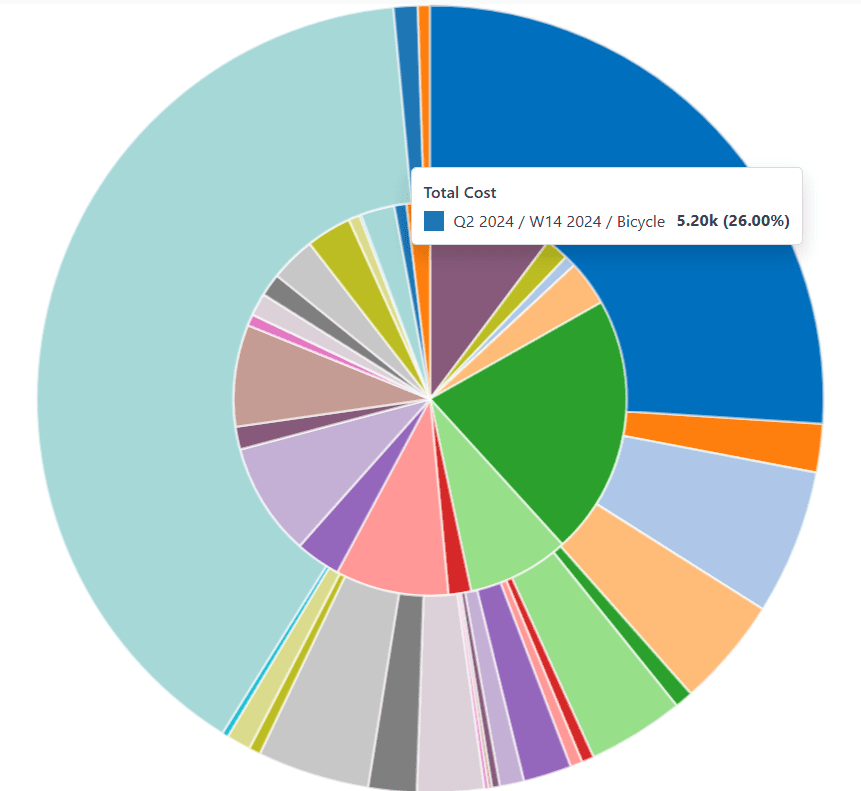
The :icon:`fa-pie-chart` (pie chart) appears as a large circle with a smaller circle inside. The larger circle represents the selected time period, while the smaller circle represents the previous time period.
The :icon:`oi-view-pivot` (pivot table) is displayed with each column split into two smaller columns. The right column represents the selected time period, while the left column represents the previous time period.
Example
In the Production Analysis report of the app, data for the second quarter of 2024 is compared to data for the second quarter of 2023. Q2 is selected in the End Date filter section of the Search... bar drop-down menu. In the Comparison section, End Date: Previous Year is selected.
سال جاری 1404 است، بنابراین دایره بزرگتر دادههای سهماهه دوم (Q2) سال 1404 را نمایش میدهد. دایره کوچکتر دادههای سهماهه دوم (Q2) سال 1403 را نمایش میدهد که همان دوره زمانی است، اما یک سال قبل.
اگر گزینه تاریخ پایان: دوره قبلی انتخاب شود، دایره کوچکتر دادههای سهماهه اول (Q1) سال 1404 را نمایش میدهد، که همان بازه زمانی است، اما یک دوره قبل.
علاقهمندیها
بخش علاقهمندیها روشی برای ذخیره یک جستجوی خاص برای استفاده در آینده یا بهعنوان فیلتر پیشفرض جدید برای نمایش است.
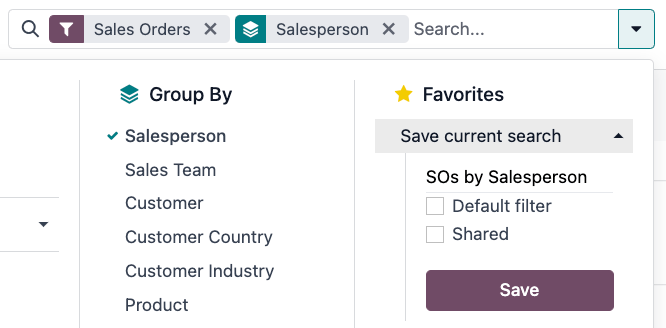
To save the current view as a favorite, click the 🔽 (down arrow) icon in the search bar, then select the Save current search drop-down menu to display the following options:
Filter name: name of the favorited search.
Default filter: sets the favorited search as the default filter for the view.
Shared: makes the favorited search available to all users. By default, the favorited search is only available to the user who created it.
پس از تنظیم گزینهها، روی ذخیره کلیک کنید تا جستجوی علاقهمندی ذخیره شود.
Saved favorites can be accessed by clicking the 🔽 (down arrow) icon in the search bar, then selecting the saved filter in the Favorites drop-down menu. To remove a saved favorite, click the 🗑️ (garbage can) icon next to the favorited search.
نکته
برای مشاهده همه جستجوهای ذخیره شده، ابتدا حالت توسعهدهنده را فعال کنید و به مسیر بروید. از اینجا، همه جستجوهای ذخیره شده را میتوان مشاهده، ویرایش، بایگانی یا حذف کرد.