New vehicles
Odoo's Fleet app manages all vehicles, and the accompanying documentation that comes with vehicle maintenance, and drivers records.
Upon opening the application, all vehicles are organized within the Vehicles dashboard, which is the default dashboard for the Fleet application. Each vehicle is displayed in its corresponding Kanban stage, based on its status. The default stages are New Request, To Order, Registered, and Downgraded.
To add a new vehicle to the fleet from the Vehicles page, click the New button in the top-left corner, and a blank vehicle form loads. Then, proceed to enter the vehicle information on the vehicle form.
The form auto-saves as data is entered. However, the form can be saved manually at any time by clicking the save manually option, represented by a (cloud upload) icon, located in the top-left corner of the page.
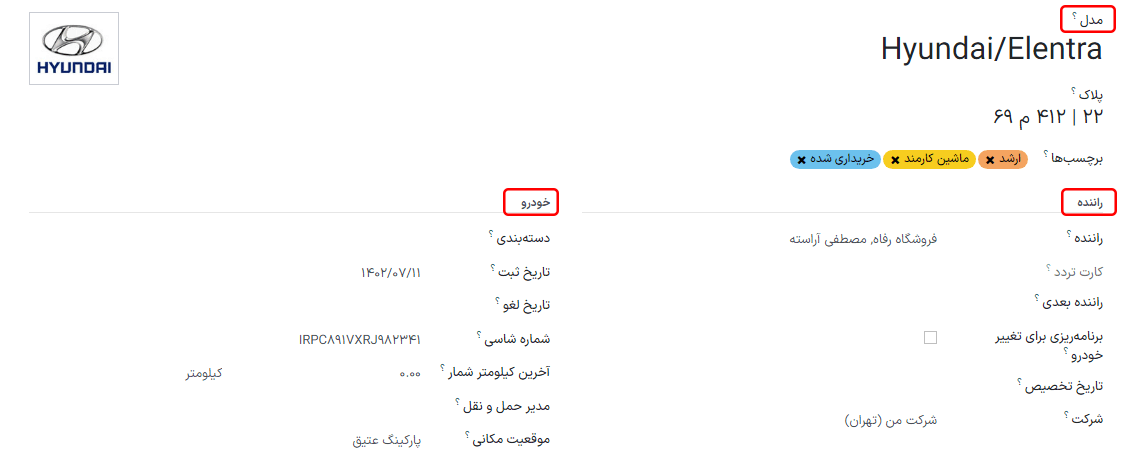
فیلدهای فرم خودرو
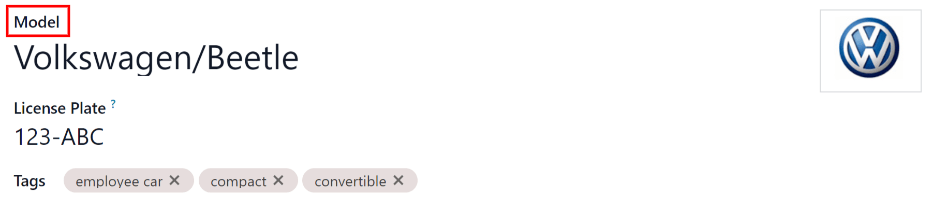
Model: select the vehicle's model from the drop-down menu. Once a model is selected, additional fields may appear on the form.
If the model is not listed, type in the model name, and click either Create "model", or Create and edit... to create a new model and edit the model details.
پلاک: شماره پلاک وسیله نقلیه را در این قسمت وارد کنید.
برچسبها: برچسب(هایی) را با استفاده از منوی کشویی انتخاب کنید. محدودیتی از لحاظ تعداد برچسبهای قابل استفاده وجود ندارد.
توجه
The Model is the only required field on the new vehicle form. When a model is selected, other fields appear on the vehicle form, and relevant information auto-populates the fields that apply to the model. If some of the fields do not appear, this may indicate there is no model selected.
بخش راننده
این بخش از فرم وسیله نقلیه مربوط به شخصی است که در حال حاضر رانندگی خودرو را بر عهده دارد و همچنین هرگونه برنامه برای تغییر راننده در آینده و زمان آن در این قسمت مشخص میشود.
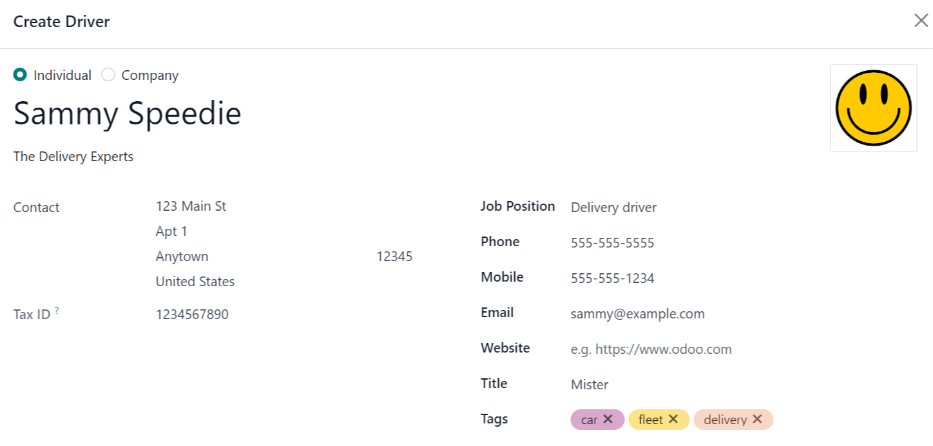
Driver: select the driver from the drop-down menu, or type in a new driver and click either Create "driver" or Create and edit... to create a new driver, and edit the driver details.
مهم
A driver does not have to be an employee. When creating a new driver, the driver is added to the Fleet application, not the Employees application.
If the Contacts application is installed, the driver information is also stored in the Contacts application.
Mobility Card: if the selected driver has a mobility card listed on their employee card in the Employees application, the mobility card number appears in this field. If there is no mobility card listed, and one should be added, edit the employee record in the Employees application.
Future Driver: if the next driver for the vehicle is known, select the next driver from the drop-down menu. Or, type in the next driver and click either Create "future driver" or Create and edit... to create a new future driver, and edit the driver details.
Plan To Change Car: if the current driver set for this vehicle plans to change their vehicle - either because they are waiting on a new vehicle that is being ordered, or this is a temporary vehicle assignment, and they know which vehicle they are driving next - check this box. Do not check this box if the current driver does not plan to change their vehicle.
Assignment Date: using the drop-down calendar, select when the vehicle is available for another driver. Select the date by navigating to the correct month and year using the ⬅️ (left arrow) and ➡️ (right arrow) icons. Then, click on the specific day. If this field is left blank, that indicates the vehicle is currently available, and can be reassigned to another driver. If it is populated, the vehicle is not available for another driver until the selected date.
Company: select the company from the drop-down menu. This field only appears in a multi-company database.
ایجاد راننده جدید
اگر یک راننده از قبل در سیستم نیست، ابتدا باید راننده جدید پیکربندی و به پایگاه داده اضافه شود. راننده جدید را میتوان از فیلدهای راننده یا راننده آینده در فرم وسیله نقلیه اضافه کرد.
ابتدا، نام راننده جدید را در فیلد راننده یا راننده آینده تایپ کنید، سپس روی ایجاد و ویرایش... کلیک کنید. فرم ایجاد راننده یا ایجاد راننده آینده، بسته به اینکه کدام فیلد فرم را آغاز کرده است، ظاهر میشود.
Both the Create Driver and Create Future Driver forms are identical.
توجه
بسته به برنامههای نصب شده، ممکن است تبها یا فیلدهای مختلفی در فرمهای ایجاد راننده و ایجاد راننده آینده قابل مشاهده باشند.
اطلاعات عمومی
Fill out the following information on the top-half of the form:
Individual or Company: choose if the driver being added is an individual driver or a company. Click the radio button to make a selection.
When a selection is made, some fields may disappear from the form. If any of the fields below are not visible, that is because Company was selected instead of Individual.
Name: enter the name of the driver or company in this field.
Company Name...: using the drop-down menu, select the company the driver is associated with.
If the Company radio button is selected at the top of the form, this field does not appear.
Contact: enter the contact information in this section.
If desired, the Contact field can be changed to a different type of contact. Click on Contact to reveal a drop-down menu. The available options to select are Contact, Invoice Address, Delivery Address, Follow-up Address, or Other Address.
If desired, select one of these other options for the Contact field, and enter the corresponding information.
If the Company radio button is selected at the top of the form, this field is labeled Address and cannot be modified.
Tax ID: enter the driver or company's tax ID in this field.
Job Position: enter the driver's job position in this field. If the Company radio button is selected at the top of the form, this field does not appear.
Phone: enter the driver or company's phone number in this field.
Mobile: enter the driver or company's mobile number in this field.
Email: enter the driver or company's email address in this field.
Website: enter the driver or company's website address in this field.
Title: using the drop-down menu, select the driver's title in this field. The default options are Doctor, Madam, Miss, Mister, and Professor.
If the Company radio button is selected at the top of the form, this field does not appear.
Tags: using the drop-down menu, select any tags that apply to the driver or company.
To add a new tag, type in the tag, then click Create "tag".
There is no limit to the number of tags that can be selected.
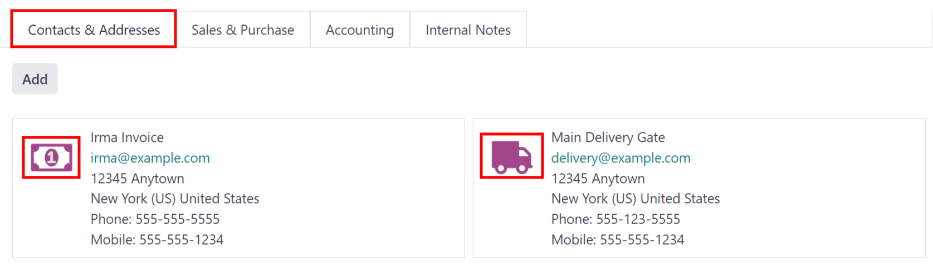
Contacts & Addresses tab
After completing the top-half of the Create Driver or Create Future Driver form, add any other contacts and addresses associated with the driver or company in this tab.
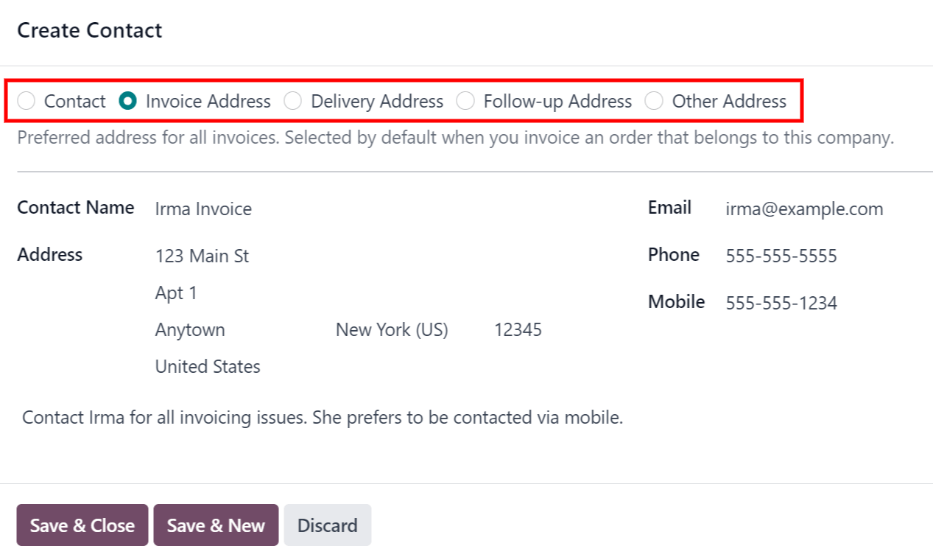
To add a new contact, click the Add button, and a Create Contact pop-up window appears.
Before entering the necessary information on the form, select the type of contact being added from a series radio button options located at the top of the form. Those options are:
Contact: select this option to add general contact details for employees of the associated company.
Invoice Address: select this option to add a preferred address for all invoices. When added to the form, this address is selected by default when sending an invoice to the associated company.
Delivery Address: select this option to add a preferred address for all deliveries. When added to the form, this address is selected by default when delivering an order to the associated company.
Follow-up Address: select this option to add a preferred address for all follow-up correspondence. When added to the form, this address is selected by default when sending reminders about overdue invoices.
Other Address: select this option to add any other necessary addresses for the company or driver.
Depending on the Contact Type, some optional fields may not be visible. The available fields are identical to the fields in the general information section of the new driver form.
Add any notes to the Internal notes... section of the form.
After entering all of the information, click either Save & Close to add the one new contact, or Save & New to add the current address record and create another address record.
As contacts are added to this tab, each contact appears in a separate box, with an icon indicating what type of contact is listed.
Example
An Invoice Address displays a 💲 (dollar sign) icon inside that specific address box, whereas a Delivery Address displays a 🚚 (truck) icon inside.
Sales & Purchase tab
Enter the following sales and purchasing information, in the Sales & Purchase tab of the Create Driver or Create Future Driver pop-up form for the various sections below.
Depending on the other installed applications, additional fields and sections may appear. The following are all default fields for the Fleet application only.
Sales section
Salesperson: using the drop-down menu, select the user who is the main point of contact for sales with this driver's company.
This person must be an internal user of the company, meaning they can log into the database as a user.
Misc
Company ID: if the company has an ID number, other than its tax ID, enter it in this field.
Reference: enter any text to give more information regarding the contact person. This is an internal note to provide any additional information.
Example
A company has several people with the same name, John Smith. The Reference field could state
John Smith at X205 - purchaserto provide additional details.
Internal Notes tab
Add any notes that pertain to the driver, or any other necessary information, in this tab.
بخش خودرو
This section of the vehicle form relates to the physical details of the vehicle.
If a preexisting vehicle in the database was selected for the Model field in the top portion of the form, some fields may auto-populate, and additional fields may also appear.
فیلدهای زیر را در فرم پر کنید:
Category: using the drop-down menu, select the vehicle category from the available options. To create a new category, type in the new category name, then click Create "category".
Order Date: using the drop-down calendar, select the date the vehicle was ordered.
Registration Date: using the drop-down calendar, select the date the vehicle was registered.
Cancellation Date: using the drop-down calendar, select the date the vehicle lease expires, or when the vehicle is no longer available.
شماره شاسی: شماره شاسی را در فیلد وارد کنید. این شماره در برخی از کشورها به عنوان شماره VIN شناخته میشود.
آخرین کیلومترشمار: در قسمت عددی، آخرین قرائت کیلومترشمار را وارد کنید. با استفاده از منوی کشویی کنار قسمت عددی، انتخاب کنید که قرائت کیلومترشمار بر حسب کیلومتر (کیلومتر) یا مایل (مایل) است.
Fleet Manager: select the fleet manager from the drop-down menu, or type in a new fleet manager, and click either Create or Create and Edit.
Location: type in the specific location where the vehicle is typically located in this field. The entry should clearly explain where the vehicle can be found, such as
Main GarageorBuilding 2 Parking Lot.
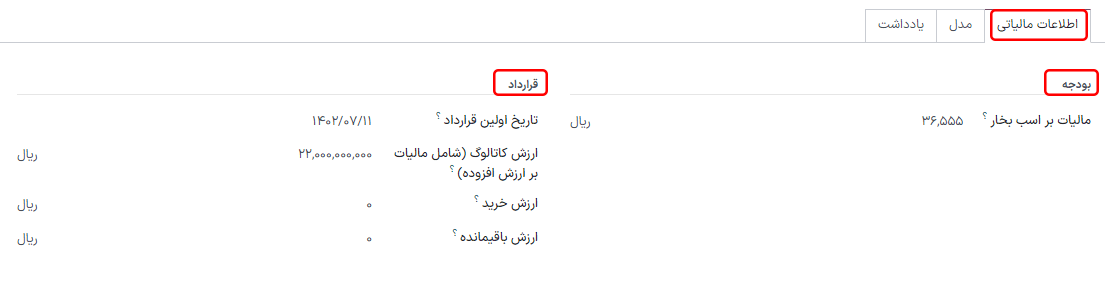
تب اطلاعات مالیات
بسته به تنظیمات بومیسازی پایگاه داده و برنامههای اضافی نصب شده، ممکن است فیلدهای دیگری در فرم وجود داشته باشند.
بخشهای زیر پیشفرض هستند و برای تمام وسایل نقلیه، صرفنظر از سایر برنامههای نصب شده یا تنظیمات بومیسازی، ظاهر میشوند.
امور مالی و مالیاتی
مالیات بر اسب بخار: مقداری که بر اساس موتور خودرو مالیات دریافت میشود را وارد کنید. این مقدار بر اساس قوانین و مقررات محلی بوده و با بر اساس مکان متغیر است. توصیه میشود برای اطمینان از صحت مقدار وارد شده با دپارتمان حسابداری هماهنگ شوید.
قرارداد
تاریخ اولین قرارداد: تاریخ شروع اولین قرارداد وسیله نقلیه را با استفاده از تقویم کشویی انتخاب کنید. به طور معمول این تاریخ، روز خرید یا اجاره وسیله نقلیه است.
ارزش کاتالوگ (مشمول مالیات): قیمت خرده فروشی پیشنهادی تولیدکننده (MSRP) خودرو به هنگام خرید یا لیزینگ را وارد کنید.
ارزش خرید: قیمت خرید یا ارزش اجاره وسیله نقلیه را وارد کنید.
ارزش باقیمانده: ارزش فعلی وسیله نقلیه را وارد کنید.
توجه
مقادیر لیست شده در بالا بر دپارتمان حسابداری تأثیر میگذارند. توصیه میشود برای اطلاعات بیشتر یا کمک در مورد این مقادیر، با دپارتمان حسابداری بررسی کنید.
تب مدل
اگر مدل وسیله نقلیه جدید از قبل در پایگاه داده پیکربندی شده باشد، تب مدل با اطلاعات مربوطه پر خواهد شد. اگر مدل از قبل در پایگاه داده نباشد و نیاز به پیکربندی تب مدل باشد، مدل وسیله نقلیه جدیدی پیکربندی کنید.
اطلاعات را در تب مدل بررسی کنید تا از صحت آن اطمینان حاصل شود. به عنوان مثال، رنگ وسیله نقلیه یا اینکه آیا قلاب تریلر نصب شده است، نمونههایی از اطلاعات رایجی هستند که ممکن است نیاز به بهروزرسانی داشته باشند.

تب یادداشت
هرگونه یادداشت مورد نیاز برای خودرو را در این بخش وارد کنید.