حضور و غیاب
Odoo's Attendances application functions as a time clock. Employees are able to check in and out of work using a dedicated device in kiosk mode, while users are also able to check in and out of work directly from the database. Managers can quickly see who is available at any given time, create reports to see everyone's hours, and gain insights on which employees are working overtime, or checking out of work earlier than expected.
سطوح دسترسی
It is important to understand how the different access rights affect what options and features users can access in the Attendances application.
Every user in the database is able to check in and out directly from the database, without needing access to the Attendances application. Additionally, all users can access their own attendance records from their employee form in the Employees app.
Access to both the Attendances application, and the various features within the application is determined by access rights.
To see what access rights a user has, navigate to the , and click on an individual user. The Access Rights tab is visible by default. Scroll down to the Human Resources section to see the setting. For the Attendances field, the options are either to leave the field blank or select Administrator.
If the Administrator option is selected, the user has full access to the entire Attendances application, with no restrictions. They can view all employee attendance records, enter Kiosk mMode from the application, access all reporting metrics, and make modifications to the settings. If left blank, the user does not have access to the Attendances application.
تأییدکنندگان
The only other scenario where different information may be accessible in the Attendances application is for approvers. If a user does not have administrative rights for the Attendances application, but they are set as an employee's approver for the Attendances application, that user is able to view the attendance records for that specific employee, as well as make modifications to that employee's attendance records, if necessary. This applies to all employees for whom the user is listed as the Attendances application approver. Approvers are typically managers, though this is not required.
To see who the attendance approver is for an employee, navigate to the and click on the specific employee. Click on the Work Information tab, scroll to the Approvers section, and check the Attendance field. The person selected is able to view that employees' attendance records, both on the Attendances application dashboard as well as in the attendance reports, and make modifications to their records.
پیکربندی
Few configurations are needed in the Attendances application. Determining how employees check in and out, defining how the kiosks function, and determining how extra hours are computed are all set in the Configuration menu. Navigate to the to access the configuration menu.
حالتها
Attendances from Backend: activate this selection to allow users to check in and out directly from the Odoo database. If this is not activated, users must use a kiosk to check in and out of work.
Extra hours
This section specifies how extra time is calculated, including when extra time is counted and what time is not logged.
Count of Extra Hours: enable this box to allow employees to log extra hours beyond their set working hours (sometimes referred to as overtime). Activating this selection displays the following settings as well. If this is not activated, no other configurations appear.
Start From: the current date is automatically entered in this field. If desired, click on this field and use the calendar selector to modify the start date on which extra hours are logged.
زمان قابل تحمل به نفع شرکت: مدت زمان را به دقیقه وارد کنید که اضافهکاری کارمند محاسبه نمیشود. هنگامی که کارمند خروج میزند و زمان اضافی ثبت شده کمتر از دقایق مشخص شده باشد، این زمان اضافی به عنوان اضافهکاری برای کارمند محاسبه نمیشود.
زمان قابل تحمل به نفع کارمند: مدت زمان را به دقیقه وارد کنید که به عنوان ارفاق به کارمند داده میشود و اگر کمتر از ساعات کاری خود کار کند، تأثیر منفی بر حضور و غیاب او ندارد. هنگامی که کارمندی خروج میزند و کل زمان ثبت شده برای روز کمتر از ساعات کاری مشخص شده و کمتر از این دوره ارفاق باشد، برای کاهش ساعات کاری خود جریمه نمیشود.
Example
یک شرکت هر دو فیلد تلرانس را روی
۱۵دقیقه تنظیم میکند و ساعات کاری کل شرکت از ۹:۰۰ صبح تا ۵:۰۰ بعد از ظهر تعیین شده است.اگر کارمندی ساعت ۹:۰۰ صبح ورود بزند و ساعت ۵:۱۴ بعد از ظهر خروج بزند، ۱۴ دقیقه اضافی به عنوان اضافهکاری او محاسبه نمیشود.
اگر کارمندی ساعت ۹:۰۵ صبح ورود بزند و ساعت ۴:۵۵ بعد از ظهر خروج بزند، حتی اگر در مجموع ۱۰ دقیقه کمتر از ساعات کاری کامل خود کار کرده باشد، برای این مغایرت جریمه نمیشود.
نمایش ساعات اضافی: با فعال کردن این گزینه، ساعات اضافی ثبت شده توسط کارمند هنگام خروج با کیوسک یا هنگام خروج در پایگاه داده نمایش داده شود.
توجه
Employees are still able to log overtime hours even if the Count of Extra Hours option is not activated. The difference is that when Count of Extra Hours is activated, the extra hours can be deducted from an approved time off request.
بررسی اجمالی
When entering the Attendances application, the Overview dashboard is presented, containing all the check in and check out information for the signed in user. If the user has specific access rights and/or are approvers for specific employees, then those additional employee's check in and check out information is also visible on the Overview dashboard.
Views
To change the view from the default Gantt chart to a list view, click the List icon in the top right of the dashboard, beneath the user's photo. To switch back to the Gantt chart, click the Gantt button, located next to the List button.
The default view presents the current day's information. To present the information for the Week, Month, or Year, click on the Day button to reveal a drop-down, displaying those other options. Select the desired view, and the dashboard updates, presenting the selected information. To change the Day, Week, Month, or Year presented, click the ← (left arrow) or → (right arrow) buttons on either side of the drop-down menu. To jump back to a view containing the current day, click the Today button. This refreshes the dashboard, presenting information containing the current day's information.
In the Day view, the column for the current hour is highlighted in yellow. If the Week or Month view is selected, the column for the current day is highlighted. If the Year view is selected, the current month is highlighted.
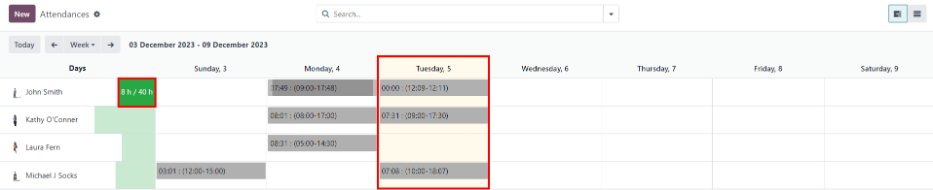
Any entries that have errors appear in red, indicating they need to be resolved by a user with the proper access rights and/or are approvers for the employee(s) with the errors.
فیلترها و گروهها
To filter the results in the overview dashboard, or to present different groups of information, click the 🔻 (triangle drop down) button in the right side of the Search bar above the dashboard, and select one of the available Filters or Group By options. There are several pre-configured filters and groups to choose from, as well as an option to create custom ones.
فیلترها
The default filters that can be selected are:
My Attendances: this filter only presents the user's attendance data.
My Team: this filter presents the attendance data for the user's team.
At Work: this filter displays the attendance data for everyone currently checked in.
Errors: this filter displays any entries with errors that need to be resolved.
Check In: this filter has a drop-down to further select a specific time period. Select the desired time period from the options presented, a specific month, quarter, or year.
Last 7 days: this filter presents the attendance data for the last seven days.
Add Custom Filter: create a custom filter using the pop-up that appears when this is selected.
Groups
The default groups that can be selected are:
Check In: this grouping presents a drop-down menu containing the following time period options: Year, Quarter, Month, Week, and Day. Selected the time period to display all the check-in information, grouped by the selected time period.
Employee: this group presents the attendance data organized by employee.
Check Out: this grouping presents a drop-down menu containing the following time period options: Year, Quarter, Month, Week, and Day. Selected the time period to display all the check-out information, grouped by the selected time period.
Add Custom Group: this option displays a drop-down menu with a variety of options to group the attendance data by, including City, Country, Mode, and IP Address.
جزئیات گزارش حضور و غیاب
Odoo captures various time and location details when a user checks in and out. The specific details provided are determined by the method the user checked in and out.
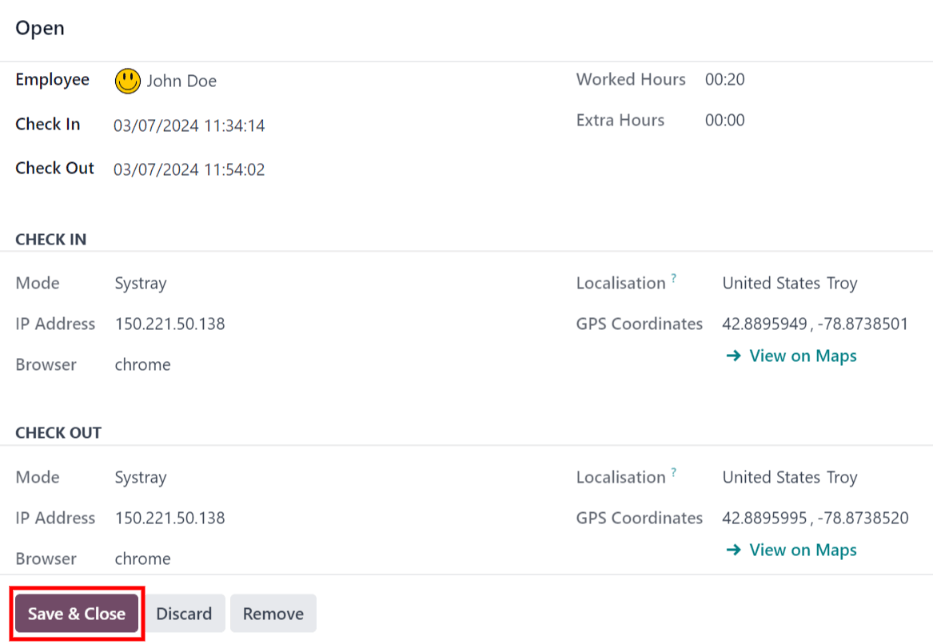
To view the specific check in and/or check out details for an employee, click on an individual entry in the overview dashboard.
A detailed attendance log for the user appears in a pop-up window. To close the detailed attendance log, click the Save & Close button in the bottom-left corner of the form.
گزارش دقیق حضور و غیاب شامل اطلاعات زیر است:
جزئیات اصلی
کارمند: نام کارمند.
ورود: تاریخ و زمانی که کارمند وارد شده است.
Check Out: the date and time the employee checked out. This only appears if the employee has checked out.
Worked Hours: the total amount of time the employee logged for the day, in an hour and minute format (HH:MM). This value calculates all the checks in and check outs for the day, if the employee checked in and out multiple times.
Extra Hours: any extra hours the employee logged that is beyond their expected working hours.
جزئیات ورود/خروج
اطلاعات زیر برای هر دو بخش ورود و خروج ظاهر میشود.
Mode: the method with which the attendance information was gathered. Systray is displayed if the employee logged in and out directly from the database, Manual is displayed if the employee logged in and out using an attendance kiosk.
IP Address: the IP address for the computer the employee used to log in or out.
مرورگر: مرورگر وبی که کارمند برای ورود یا خروج استفاده کرده است.
Localization: the city and country associated with the computer's IP address.
GPS Coordinates: the specific coordinates when the user logged in or out. To view the specific coordinates on a map, click the → View on Maps button beneath the GPS Coordinates. This opens a map in a new browser tab, with the specific location pointed out.
خطاها
Entries that contain an error appear on the overview dashboard in red. In the Gantt view, the entry appears with a red background. If in the List view, the entry text appears in red.
An error typically occurs when an employee has checked in but has not checked out within the last 24 hours, or when an employee has a check in and check out period spanning over 16 hours.
برای رفع خطا، داده حضور و غیاب باید اصلاح یا حذف شود. روی داده کلیک کنید تا پنجره جزئیات آن باز شود. برای اصلاح اطلاعات ورود یا خروج، روی فیلد ورود یا خروج کلیک کنید تا یک انتخابگر تقویم ظاهر شود. روی تاریخ مورد نظر کلیک کنید، سپس از انتخابگر زمان زیر تقویم برای انتخاب زمان داده استفاده کنید. وقتی اطلاعات صحیح بود، روی اعمال کلیک کنید.
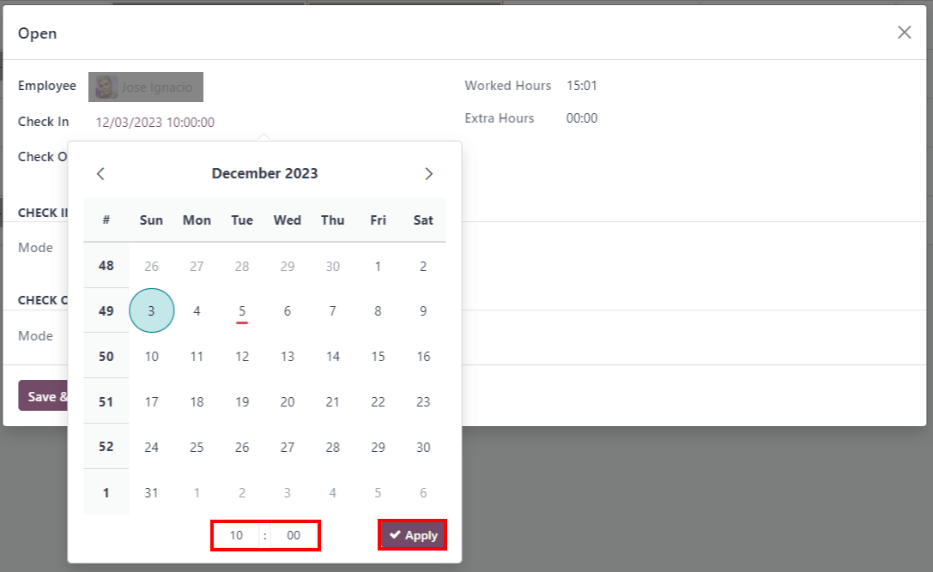
وقتی تمام اطلاعات روی پاپآپ صحیح بود، روی ذخیره و بستن کلیک کنید. وقتی داده بدون خطا باشد، به جای رنگ قرمز، به رنگ خاکستری ظاهر میشود.
To delete an entry, click Remove on the pop-up instead of making modifications to the entry.
گزارشگیری
To view attendance reports, click Reporting in the top menu. The default report displays each employee's attendance information for the past 3 months, in a Line Chart.
The default view is a Graph. To view the data in a pivot table, click the Pivot Table button on the top right of the report. To switch back to the graph view, click the Graph button, located next to the Pivot Table button.
برای ارائه اطلاعات متفاوت، فیلترها و گروهها را همانند داشبورد نمای کلی تنظیم کنید.
The data can be presented in either a Bar Chart, Line Chart, Pie Chart, Stacked chart, or in Descending or Ascending order. To change the view to any of these charts, click the corresponding button above the displayed chart.
To change the Measures, click the Measures button and select the desired measure from the drop-down menu.
The report can also be inserted into a spreadsheet. Click the Insert in Spreadsheet button and a pop-up appears. Select the desired spreadsheet, and click Confirm.

همچنین ملاحظه نمائید