کیوسکها
Odoo's Attendances app allows employees to check in and out of work directly from the database, or from a kiosk.
کیوسک یک دستگاه اختصاصی (یک رایانه شخصی، تبلت یا تلفن همراه) است که کارمندان برای ثبت ورود و خروج خود از آن استفاده میکنند.
کیوسکها برای کارمندانی که به پایگاه داده دسترسی ندارند مورد نیاز هستند.
Only employees with access to the database can check in and out from the Attendances app, and they are referred to as users.
مهم
اگر کارمندان با استفاده از کارت یا RFID ورود و خروج میکنند، برای استفاده از این دو روش، یک دستگاه در حالت کیوسک باید موجود باشد.
پیکربندی
There are only a few configurations needed to use kiosks in the Attendances application. Navigate to to access the Settings page to configure the Kiosk Mode section and the بخش تنظیمات کیوسک.
پس از پیکربندی تمام تنظیمات مورد نظر، برای فعالسازی آنها، روی دکمه ذخیره در صفحه تنظیمات کلیک کنید.
Kiosk Mode section
Using the drop-down menu, select how an employee checks in when using a kiosk. Options are Barcode/RFID, Barcode/RFID and Manual Selection, or Manual Selection.
توجه
The Barcode application does not need to be installed to use one of the Barcode/RFID settings.
بخش تنظیمات کیوسک
تنظیمات مختلف در بخش تنظیمات کیوسک نحوه ورود و خروج کارمندان با کیوسک را تعیین میکند.
Barcode Source: this setting only appears if one of the two Barcode/RFID selections were configured for the Kiosk Mode setting.
در صورت وجود، نحوه اسکن بارکدها در کیوسک را از طریق یکی از گزینههای منوی کشویی انتخاب کنید. بارکدها را میتوان با یک اسکنر اختصاصی یا با دوربین دستگاه (دوربین جلو یا دوربین پشت) اسکن کرد.
شناسایی پین کارمند: اگر کارمندان باید برای ورود از یک پین منحصربهفرد استفاده کنند، این گزینه را فعال کنید. پینها در رکورد هر کارمند به صورت جداگانه پیکربندی میشوند. برای اطلاعات بیشتر در مورد تنظیم پینها، به راهنمای کارمند جدید مراجعه کنید.
Display Time: determine how many seconds a check-in/check-out confirmation message remains on the kiosk screen before returning to the main check in screen.
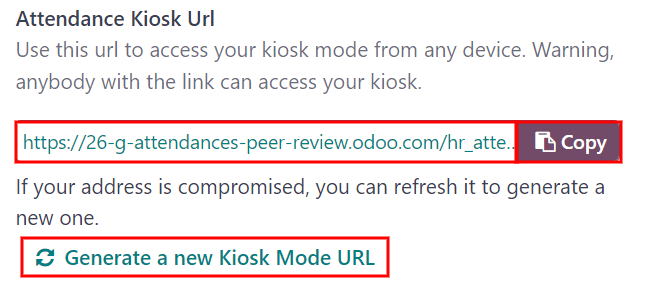
Attendance Kiosk Url: Odoo generates a unique web address (URL) to use a device as a kiosk, without having to sign in to the Odoo database. When setting up a kiosk device, navigate to this unique web address in a web browser to present the Attendances app kiosk.
مهم
These kiosk URLs are not secured with any type of access code. Anyone who has the URL can access the Attendances app kiosk. If the URL is compromised for any reason, such as in the event of a security breach, click Generate a new Kiosk Mode URL, located beneath the link, to generate a new URL, and update the kiosk, accordingly.
حالت کیوسک
ورود به حالت کیوسک فقط برای کاربرانی با سطوح دسترسی خاص در دسترس است.
حالت کیوسک را میتوان به دو روش مختلف فعال کرد:
از روی حالت کیوسک در منوی بالا کلیک کنید. سپس دستگاه از سازمانیار خارج شده و وارد حالت کیوسک میشود.
به بروید. در بخش تنظیمات کیوسک، از لینک فیلد URL کیوسک حضور و غیاب برای ورود به حالت کیوسک روی هر دستگاهی استفاده کنید.
به عنوان یک اقدام امنیتی، هنگامی که دستگاه در حالت کیوسک قرار میگیرد، بازگشت به پایگاه داده بدون ورود مجدد امکانپذیر نیست.
توجه
در هر زمان، در صورت نیاز میتوان یک URL کیوسک جدید ایجاد کرد. روی :icon:`fa-refresh` ایجاد یک URL حالت کیوسک جدید کلیک کنید.
To exit Kiosk Mode, just close the tab in the web browser or return to the main log-in screen of Odoo.
ورود و خروج با کیوسک
نشان
To check in or out using a badge, tap the :icon:`fa-camera` Tap to scan image in the center of the kiosk.
سپس، بارکد روی کارت را با استفاده از روش پیکربندی شده در بخش تنظیمات کیوسک منوی پیکربندی اسکن کنید.
پس از اسکن بارکد، ورود یا خروج کارمند ثبت میشود و یک پیام تأیید با تمام اطلاعات ظاهر میشود.
RFID
To check in or out using an RFID key fob, simply scan the fob with an RFID reader.
پس از اسکن، ورود یا خروج کارمند ثبت میشود و یک پیام تأیید با تمام اطلاعات ظاهر میشود.
دستی
کاربرانی که نشان قابل اسکن یا تگ RFID ندارند، میتوانند به صورت دستی در کیوسک ورود و خروج کنند.
Tap the Identify Manually button on the kiosk, and a screen appears with all the employees that can be checked in or out. The Employees application dashboard has the same display.
برای ثبت ورود یا خروج یک فرد، روی نام او ضربه بزنید تا پیام تأیید ظاهر شود.
There are two ways to quickly find a specific person:
Search...: tap on the Search... field, and enter the desired person's name. As the name is typed in, the matching results are displayed on the screen.
Department: tap on any desired selection in the Department section, located on the left-side of the screen, to only view employees from that specific department. The number at the end of each listed Department represents how many employees that department has.
پین کد
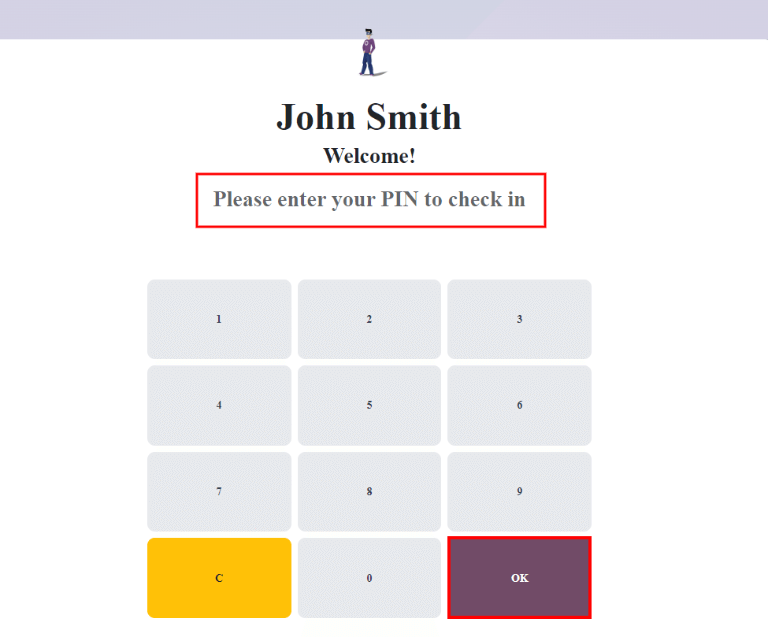
اگر کادر شناسایی پین کارمند در بخش تنظیمات کیوسک منوی پیکربندی تیک خورده باشد، هنگام ورود یا خروج دستی، از کارمند خواسته میشود پین خود را وارد کند.
After the employee is selected, a number pad appears with a message. When checking in, (Employee) Welcome! Please enter your PIN to check in appears above the numbers. When checking out, (Employee) Want to check out? Please enter your PIN to check out appears above the numbers.
پین را با استفاده از صفحه کلید عددی وارد کنید، سپس پس از اتمام روی تأیید ضربه بزنید. سپس ورود یا خروج کارمند ثبت میشود و یک پیام تأیید ظاهر میشود.
پیام تأیید
When an employee checks in or out, a confirmation message appears, with all the check in or check out information. When checking in, a welcome message appears, as well as the date and time of check in.
An Hours Previously Today: HH:MM field also appears, displaying any time that has
already been logged for that employee for the day. If no time has been logged, the value displayed
is: 00:00. Beneath the message is an OK button.
To exit the screen before the preset time in the kiosk, tap the OK button.
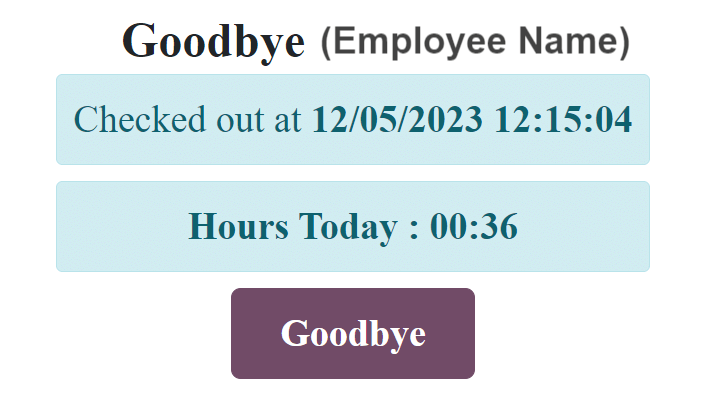
When checking out, the screen displays a goodbye message, with the date and time of check out, and the total hours logged for the day. Beneath the message is a Goodbye button. To exit the screen before the preset time, tap the Goodbye button.