موقعیتهای شغلی
در برنامه استخدام سازمانیار، تمام موقعیتهای شغلی در داشبورد پیشفرض برنامه استخدام نمایش داده میشوند. این داشبورد شامل موقعیتهایی است که فعالانه برای آنها استخدام انجام میشود و همچنین موقعیتهای غیرفعال.
هر موقعیت شغلی در یک کارت کانبان مجزا نمایش داده میشود. اگر موقعیت شغلی فعال باشد و داوطلبان بتوانند درخواست ارسال کنند، برچسب منتشر شده در گوشه بالا و چپ کارت ظاهر میشود.
با کلیک بر روی هریک از موقعیتهای شغلی میتوانید تقاضاهای ثبت شده را مشاهده نمایید.

ایجاد موقعیت شغلی جدید
برای ایجاد موقعیت شغلی جدید از داشبورد اصلی در برنامه استخدام، روی دکمه جدید در گوشه بالا و راست کلیک کنید تا پنجره ایجاد موقعیت شغلی ظاهر شود.
ابتدا، نام موقعیت شغلی (مانند مدیر فروش، مهندس مکانیک و غیره) را در فیلد وارد کنید.
سپس، ایمیل درخواست را با تایپ کردن نیمه اول آدرس ایمیل در فیلد اول وارد کرده و سپس نیمه دوم ایمیل را با استفاده از منوی کشویی در فیلد دوم انتخاب کنید. متقاضیان میتوانند رزومه خود را به این آدرس ایمیل مشخص ارسال کنند تا سازمانیار به طور خودکار یک درخواست برای آنها ایجاد کند.
پس از تکمیل، برای ذخیره داده روی دکمه ایجاد یا برای حذف آن روی دکمه صرف نظر کلیک کنید.

پس از ایجاد موقعیت شغلی، به صورت یک کارت در نمای کانبان در داشبورد اصلی برنامه استخدام ظاهر میشود.
ویرایش موقعیت شغلی
بعد از ایجاد شدن موقعیت شغلی نوبت وارد کردن جزئیات آن میرسد. در گوشه بالا و چپ کارت مربوطه آیکون ⋮ (سه نقطه) را کلیک کنید تا گزینههای مختلف آن نمایش داده شود و برای ویرایش جزئیات دکمه پیکربندی را کلیک کنید.

تمام اطلاعات اولیه مربوط به موقعیت شغلی در تب استخدام فهرست شده است.
هیچ کدام از فیلدها الزامی نیستند، اما پیکربندی و تکمیل فیلدهای دپارتمان، محل کار، نوع استخدام و خلاصه شغل مهم است، زیرا همه آنها برای متقاضیان احتمالی در وبسایت قابل مشاهده هستند.
فیلدها را میتوان به این شکل تکمیل کرد:
دپارتمان: دپارتمان مربوط به موقعیت شغلی را انتخاب کنید. این مورد در وبسایت قابل مشاهده است.
محل کار: آدرس فیزیکی شغل را انتخاب کنید. اگر موقعیت شغلی دورکاری است، این فیلد را خالی بگذارید. این مورد در وبسایت قابل مشاهده است.
ایمیل مستعار: آدرس ایمیلی را وارد کنید که متقاضیان بتوانند رزومه خود را به آن ارسال کنند. پس از ارسال ایمیل، سازمانیار به طور خودکار یک درخواست برای آنها ایجاد میکند.
نوع استخدام: با استفاده از منوی کشویی، نوع موقعیت شغلی را انتخاب کنید. گزینههای پیشفرض عبارتند از دائم، موقت، فصلی، موقت (جایگزین)، تمام وقت و پاره وقت. این مورد در وبسایت قابل مشاهده است.
شرکت: شرکتی که شغل برای آن است را انتخاب کنید. این فیلد تنها در صورت استفاده از پایگاه داده چند شرکتی ظاهر میشود.
هدف: تعداد کارمندانی که قرار است برای این موقعیت استخدام شود را وارد کنید.
منتشر شده است: برای اینکه موقعیت شغلی به صورت آنلاین منتشر شود این گزینه را فعال کنید.
وبسایت: وبسایتی که شغل در آن منتشر میشود را انتخاب کنید.
استخدامکننده: فرد مسئول استخدام برای این نقش را انتخاب کنید.
مصاحبهکنندگان: افرادی که باید مصاحبهها را انجام دهند را انتخاب کنید. چند نفر را میتوان انتخاب کرد.
فرم مصاحبه: یک فرم مصاحبه را انتخاب کنید که متقاضیان قبل از مصاحبه خود آن را تکمیل میکنند.
قالب قرارداد: یک قالب قرارداد را برای استفاده در ارسال پیشنهاد شغل به داوطلب انتخاب کنید.
جزئیات فرآیند: در این بخش اطلاعات آنلاین نمایش داده شده برای موقعیت شغلی آمده است. بر اساس این اطلاعات متقاضی زمانبندی و مراحل فرآیند استخدام را میبیند و میداند که چه زمانی باید منتظر پاسخ باشد.
زمان برای پاسخ: تعداد روز لازم برای برقراری تماس با متقاضی را وارد کنید.
فرآیند: مراحل مختلفی که داوطلب در فرآیند استخدام طی میکند را وارد کنید.
روز برای دریافت پاسخ: تعداد روزهایی که متقاضی جهت دریافت پاسخ بعد از سپری شدن مرحلهها منتظر خواهد ماند را وارد کنید.
توجه
بخش جزئیات فرآیند فیلد متنی است. تمام پاسخها باید تایپ شوند، نه اینکه از لیستی انتخاب شوند. این متن دقیقاً همانطوری که نوشته شود در وب سایت نمایش داده خواهد شد.
در نهایت، شرح شغل را در تب خلاصه شغل وارد کنید.

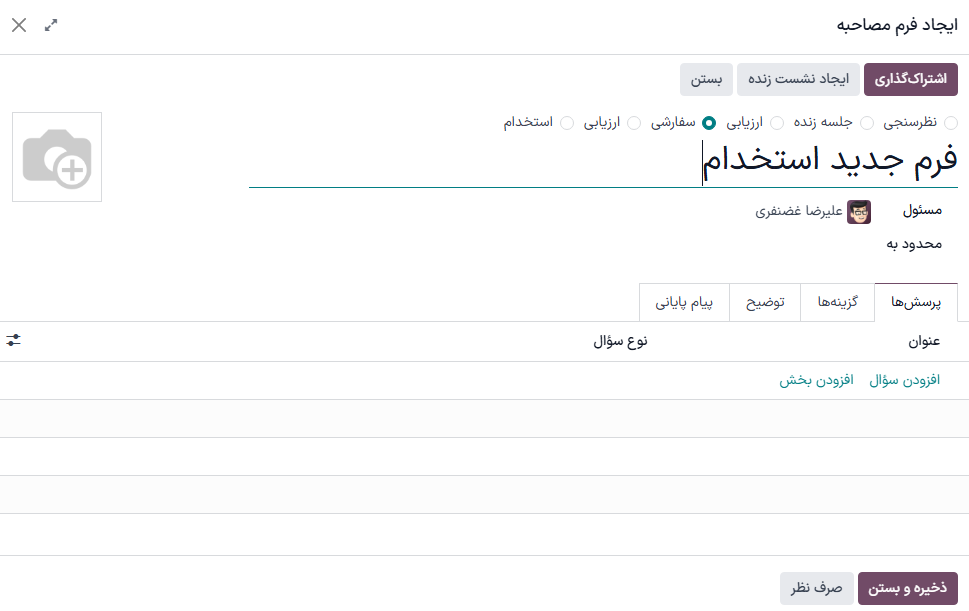
ایجاد فرم استخدام
برای تعیین اینکه آیا متقاضی برای موقعیت شغلی مناسب است یا خیر از فرم مصاحبه استفاده میشود. فرمهای مصاحبه میتوانند بسیار دقیق و جزئی و یا عمومی باشند و میتوانند به شکل گواهینامه، آزمون، یا یک پرسشنامه عمومی باشد. فرمهای مصاحبه را تیم استخدام مشخص میکند.
قبل از ایجاد فرم مصاحبه، از فعال بودن تنظیمات مناسب اطمینان حاصل کنید. وارد مسیر شوید و در بخش فرآیند استخدام، اطمینان حاصل کنید که گزینه ارسال فرم مصاحبه فعال باشد.
از آنجایی که فرم از پیش پیکربندی شدهای در سازمانیار وجود ندارد، تمام فرمهای مصاحبه باید ایجاد شوند. برای ایجاد فرم مصاحبه، از تب استخدام در فرم موقعیت شغلی شروع کنید. در فیلد فرم مصاحبه، نامی برای فرم مصاحبه جدید وارد کنید. با تایپ نام، چند گزینه درج میشود: ایجاد (نام فرم مصاحبه)، جستجوی بیشتر... و ایجاد و ویرایش.... روی ایجاد و ویرایش... کلیک کنید تا پنجره ایجاد فرم مصاحبه ظاهر شود.
توجه
گزینه جستجوی بیشتر... تنها در صورتی ظاهر میشود که فرمهای مصاحبهای از قبل ایجاد شده باشند. اگر فرمی از قبل وجود نداشته باشد، تنها گزینههای موجود ایجاد (نام فرم مصاحبه) و ایجاد و ویرایش... هستند.
برای تکمیل پنجره فرم مصاحبه مانند یک نظرسنجی عادی اقدام کنید. برای راهنماییهای مشخص در مورد نحوه ایجاد یک نظرسنجی، به راهنمای مقدمات نظرسنجی مراجعه کنید که دستورالعملهای گام به گام در مورد نحوه ایجاد و پیکربندی یک نظرسنجی را ارائه میدهد.