همگامسازی تقویم گوگل
با استفاده از امکانات تعبیه شده، تقویم گوگل را با سازمانیار همگام کرده و جلسات را در هر دو پلتفرم مشاهده و مدیریت کنید (بهروزرسانی دو جهته است). این ادغام در برنامهریزی زمانی کمککننده بوده و هیچ جلسهای فراموش نمیشود.
همچنین ببینید
انجام تنظیمات در گوگل
انتخاب (یا ایجاد) پروژه جدید
پروژه API جدیدی در گوگل ایجاد کرده و API تقویم گوگل را در آن فعال کنید. ابتدا وارد Google API Console شده و با حساب گوگل خود ورود کنید.
توجه
اگر برای اولین بار این صفحه را مشاهده میکنید، گوگل از کاربر درخواست میکند کشور را وارد کرده و شرایط و ضوابط را پذیرش کند. از لیست کشوری را انتخاب کرده و ToS را پذیرش کنید.
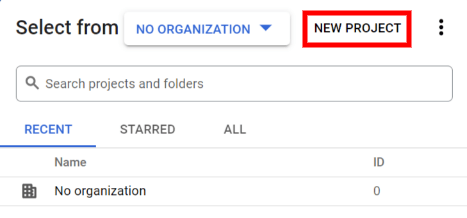
در ادامه، Select a project (انتخاب پروژه) را بزنید و یک پروژه API ایجاد کرده و OAuth را پیکربندی کنید. مجوزها و اطلاعات دریافتی را ذخیره و بر روی New Project (پروژه جدید) کلیک کنید.
نکته
نام مشخصی برای پروژه API وارد کنید، مانند «Odoo Sync» که به آسانی قابل شناسایی باشد.
فعالسازی API تقویم گوگل
حالا، در منوی چپ Enabled APIs and Services (APIها و سرویسهای فعال) را کلیک کنید. اگر نوار جستجو نشان داده نمیشود، دوباره Enabled APIs and Services را بزنید.

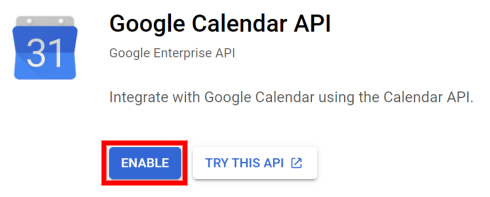
سپس، در نوار جستجو، Google Calendar API را جستجو کرده و از نتایج جستجو Google Calendar API را انتخاب کنید. بر روی Enable (فعالسازی) کلیک کنید.
برگه رضایت OAuth
حالا که پروژه API ایجاد شد، باید OAuth پیکربندی شود. برای این کار، در منوی سمت چپ OAuth consent را بزنید و سپس User Type (نوع کاربر) را انتخاب کنید.
هشدار
حسابهای جیمیل شخصی تنها میتوانند نوع کاربر خارجی (External) داشته باشند، که یعنی گوگل شاید تأییدیه درخواست کند و یا حدودی (Scopes) برای آن اضافه شود. با این همه، استفاده از حساب فضای کاری گوگل امکان استفاده از نوع کاربر داخلی را نیز فراهم کرده است.
همچنین توجه داشته باشید که هرگاه اتصال API در حالت تست خارجی باشد، تأییدیهای از طرف گوگل لازم نیست. محدودیتهای کاربر در وضعیت تست به 100 کاربر تنظیم شده است.
در گام دوم، در صفحه OAuth Consent Screen، در فیلد App name (نام برنامه)، «Odoo» را تایپ کنید، آدرس ایمیلی را برای فیلد User support email (ایمیل پشتیبان کاربر) وارد کنید، و آدرس ایمیل Developer contact information (اطلاعات تماس توسعهدهنده) را وارد نمایید. سپس بر روی ذخیره و ادامه کلیک کنید.
گام سوم، را با دکمه Save and Continue (ذخیره و ادامه) رد کنید.
در ادامه، اگر همچنان در حالت تست فعالیت میکنید (خارجی)، آدرس ایمیلی که در حال پیکربندی است را در مرحله Test users (کاربران تست) وارد کنید. این کار با کلیک بر روی Add Users (افزودن کاربران) و سپس Save and Continue (ذخیره و ادامه) انجام میشود. خلاصهای از ثبت نام برنامه نمایش داده میشود.
در نهایت به پایین اسکرول کرده و Back to Dashboard (برگشت به داشبورد) را بزنید.
حالا رضایت OAuth پیکربندی شد، و زمان ایجاد اطلاعات احراز است.
ایجاد اطلاعات احراز
برای اتصال تقویم گوگل به سازمانیار، Client ID و Client Secret هر دو مورد نیاز هستند. این آخرین گام در کنسول گوگل است. ابتدا در منوی چپ Credentials و سپس Create Credentials را بزنید و OAuth client ID را انتخاب نمایید. گوگل راهنمایی برای ایجاد اطلاعات احراز نمایش خواهد داد.
در بخش Create OAuth Client ID گزینه Website application را در فیلد Application Type وارد نمایید، و در فیلد Name عبارت My Odoo Database را وارد نمایید.
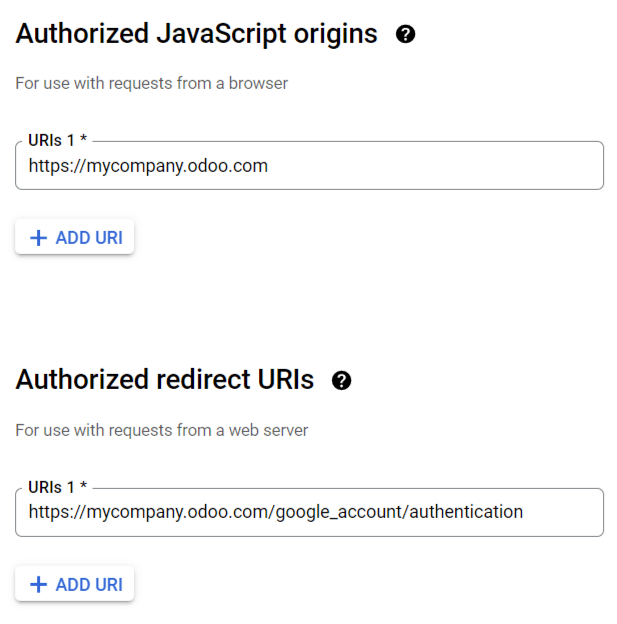
در بخش Authorized JavaScript Origins بر روی + Add URI کلیک کرده و آدرس URL کامل اودوو را وارد کنید.
در بخش Authorized redirect URIs، روی + Add URI کلیک کرده و آدرس URL کامل اودوو را وارد کرده و در ادامه آن
/google_account/authenticationرا تایپ کنید. در نهایت Create را بزنید.
در ادامه Client ID و Client Secret نمایش داده میشود. این عبارتها را در یک فایل یادداشت کنید.
راه اندازی در سمت سازمانیار
پس از دریافت Client ID و Client Secret، پایگاه داده سازمانیار خود را باز کرده و وارد منوی شوید. تیک گزینه تقویم گوگل را بزنید.

سپس، Client ID و Client Secret دریافتی را در فیلدهای مربوطه (شناسه Client ID و رمز (Secret) کاربر) زیر گزینه تقویم گوگل وارد کرده و ذخیره کنید.
همگامسازی تقویم در سازمانیار
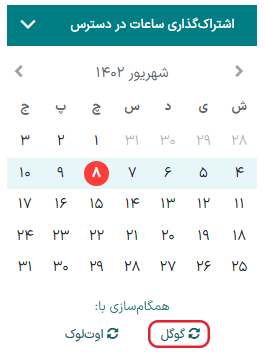
در نهایت، در سازمانیار وارد برنامه شوید و برای شروع همگامسازی تقویم، دکمه همگامسازی گوگل را بزنید.
توجه
وقتی تقویم گوگل برای اولین بار با سازمانیار همگامسازی میشود، صفحه به حساب گوگل هدایت خواهد شد. در اینجا حساب کاربری ایمیلی که باید دسترسی داشته باشد را انتخاب کرده و Continue (ادامه) را بزنید (اگر برنامه تأیید نشده است)، و در نهایت (برای دادن اجازه انتقال داده) Continue (ادامه) را بزنید.
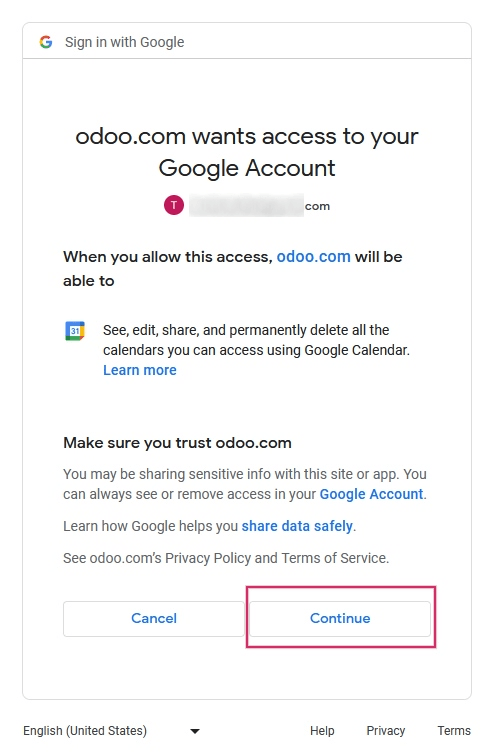
حالا تقویم سازمانیار با موفقیت با تقویم گوگل همگام شد!
هشدار
اودوو شدیداً توصیه میکند تقویم گوگل در پایگاه داده تست و با ایمیل تست (که برای اهداف دیگری استفاده نمیشود) همگامسازی و تست شود و بعداً تقویم گوگل مربوط به پایگاه داده زیربار همگامسازی شود.
پس از اینکه کاربر تقویم گوگل خود را با تقویم سازمانیار همگامسازی کرد:
ایجاد رویداد در سازمانیار باعث میشود گوگل به تمام شرکتکنندگان رویداد ایمیل دعوت ارسال کند.
حذف رویداد در سازمانیار باعث میشود به تمام شرکتکنندگان رویداد اطلاعیه لغو ارسال شود.
افزودن مخاطب به رویداد باعث میشود گوگل به تمام شرکتکنندگان رویداد دعوتنامه ارسال کند.
حذف مخاطب از رویداد باعث میشود به تمام شرکتکنندگان ایمیل لغو ارسال شود.
رویدادها را میتوان در تقویم گوگل بدون ارسال اعلان ایجاد کرد. برای این کار، هنگام درخواست ارسال ایمیلهای دعوت، گزینه ارسال نشود را انتخاب کنید.
عیبیابی همگامسازی
ممکن است گاهی اوقات حساب تقویم گوگل به درستی با سازمانیار همگام نشود. مشکلات همگامسازی را میتوان در گزارشهای پایگاه داده مشاهده کرد.
در این موارد، حساب کاربری نیاز به عیبیابی دارد. با استفاده از دکمه بازنشانی حساب میتوان تنظیمات را بازنشانی کرد. برای دسترسی به این دکمه به مسیر بروید. سپس کاربری را که میخواهید تقویم او را تغییر دهید انتخاب کرده و روی تب تقویم کلیک کنید.
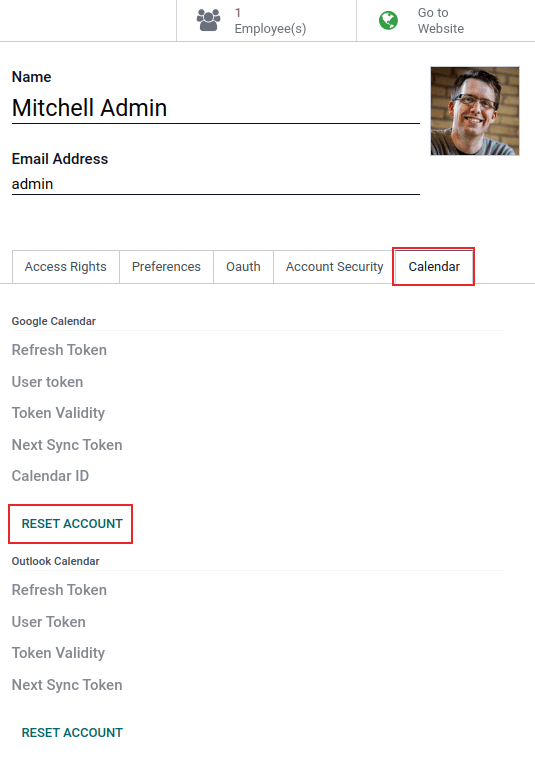
در مرحله بعد، زیر تقویم مورد نظر، روی بازنشانی حساب کلیک کنید.
گزینههای بازنشانی
گزینههای بازنشانی زیر برای عیبیابی همگامسازی تقویم گوگل با سازمانیار در دسترس هستند:
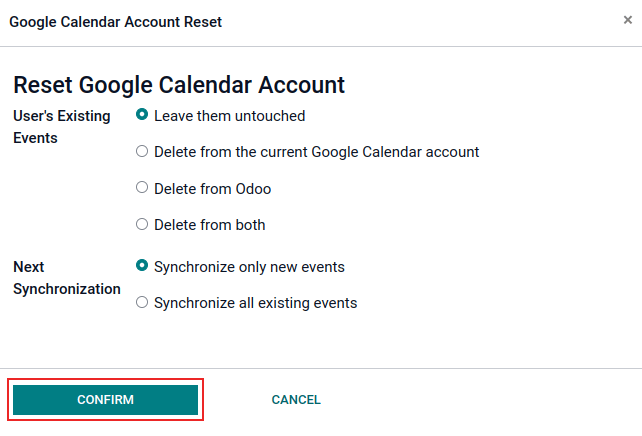
رویدادهای موجود کاربر:
دست نخورده بمانند: تغییری در رویدادها اعمال نشود.
حذف از حساب تقویم گوگل فعلی: رویدادها را از تقویم گوگل حذف کنید.
حذف از سازمانیار: رویدادها را از برنامه تقویم سازمانیار حذف کنید.
حذف از هر دو: رویدادها را هم از تقویم گوگل و هم از برنامه تقویم سازمانیار حذف کنید.
همگامسازی بعدی:
فقط رویدادهای جدید همگامسازی شوند: رویدادهای جدید را در تقویم گوگل یا برنامه تقویم سازمانیار همگامسازی کنید.
همه رویدادهای موجود همگامسازی شوند: همه رویدادها را در تقویم گوگل یا برنامه تقویم سازمانیار همگامسازی کنید.
پس از انتخاب، روی تأیید کلیک کنید تا رویدادهای کاربر و همگامسازی تقویم اصلاح شود.
سؤالات متداول Google OAuth
At times there can be misconfigurations that take place, and troubleshooting is needed to resolve the issue. Below are the most common errors that may occur when configuring the Google Calendar for use with Odoo.
وضعیت انتشار: زیربار در مقابل تست
انتخاب زیربار به عنوان وضعیت انتشار (به جای آزمایش) پیام هشدار زیر را نمایش میدهد:
OAuth تا زمانی که صفحه رضایت OAuth تأیید نشود، به 100 ورود دامنه حساس محدود شده است. این ممکن است نیازمند فرآیند تأیید باشد که ممکن است چند روز طول بکشد.
برای رفع این هشدار، وارد پلتفرم Google API شوید. اگر وضعیت انتشار In Production است، برای رفع مشکل روی Back to Testing کلیک کنید.
کاربر آزمایشی اضافه نشده است
اگر کاربر تستی به صفحه رضایت OAuth اضافه نشود، خطای Error 403: access_denied نمایش داده میشود.
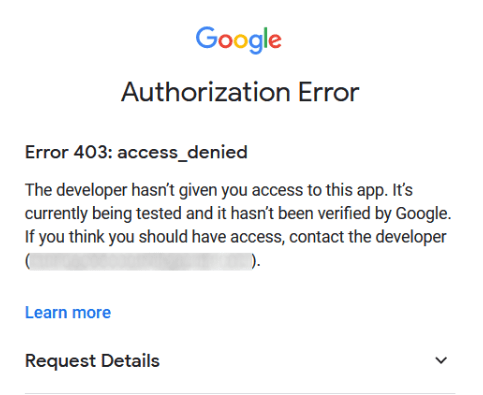
برای رفع این خطا، به صفحه رضایت OAuth در بخش APIs & Services برگردید و کاربران آزمایشی را به برنامه اضافه کنید. ایمیلی که قرار است در سازمانیار پیکربندی شود را اضافه کنید.
نوع برنامه
هنگام ایجاد اطلاعات ورود (OAuth شناسه کلاینت و رمز کلاینت)، اگر برنامه دسکتاپ برای نوع برنامه انتخاب شده باشد، خطای مجوز ظاهر می شود (خطای 400: redirect_uri_mismatch).
برای رفع این خطا، اطلاعات ورود (Credentials) موجود را حذف کنید و با انتخاب Web Application برای Application Type، اطلاعات ورود جدید ایجاد کنید.
سپس، پس از Authorized redirect URIs، روی افزودن URI کلیک کنید و عبارت https://yourdbname.odoo.com/google_account/authentication را در فیلد وارد کنید. حتماً yourdbname را در URL با نام پایگاه داده واقعی سازمانیار جایگزین کنید.
نکته
اطمینان حاصل کنید که دامنهای که در URI استفاده شده است (https://yourdbname.odoo.com/google_account/authentication) دقیقاً همان دامنهای باشد که در پارامتر سیستم web.base.url پیکربندی شده است.
با فعال کردن حالت توسعهدهنده و ورود به مسیر به web.base.url دسترسی پیدا کنید.