همگامسازی تقویم اوتلوک
همگامسازی تقویم اوتلوک کاربر با سازمانیار برای پیگیری وظایف و قرار ملاقاتها در همه برنامههای مرتبط مفید است.
تنظیمات مایکروسافت آژور
برای همگامسازی تقویم اوتلوک با تقویم سازمانیار، حساب مایکروسافت آژور الزامی است. ایجاد این حساب برای کاربرانی که تاکنون آژور را امتحان نکرده و پرداختی برای آن نداشتهاند رایگان است. برای اطلاعات بیشتر درباره حسابهای کاربری اینجا کلیک کنید.
برای کسب اطلاعات بیشتر در خصوص تنظیمات Microsoft Entra ID (که قبلاً دایرکتوری فعال مایکروسافت آژور (Azure ID) نامیده میشد) به راهنمای مایکروسافت مراجعه نمایید. این ابزار یک کنسول API است که برای مدیریت و ثبت برنامههای مایکروسافت استفاده میشود.
کاربران موجود Entra ID باید در پورتال توسعهدهنده Microsoft Azure وارد شوند. سپس، در بخش Manage Microsoft Entra ID، گزینه View را انتخاب کنید.
رجیستر برنامه
پس از ورود به سیستم با Entra ID، یک برنامه رجیستر کنید.
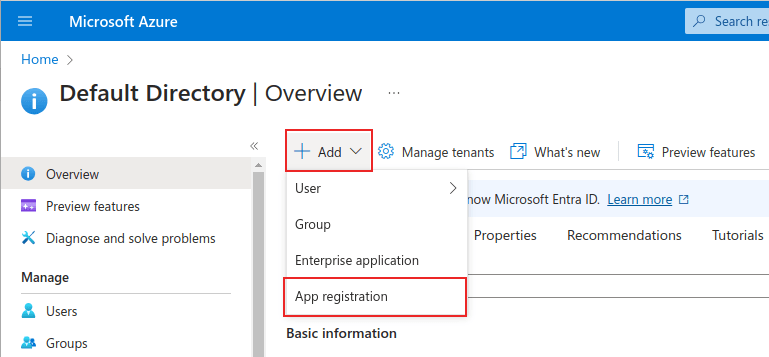
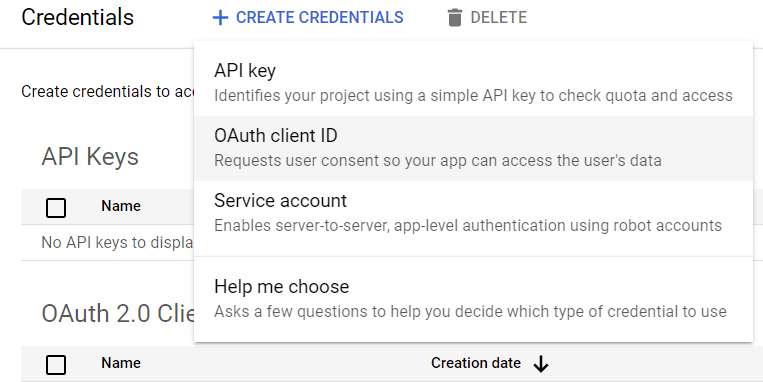
برای ایجاد یک برنامه، روی + افزودن در منوی بالا کلیک کنید. از منوی کشویی باز شده، App Registration را انتخاب کنید.
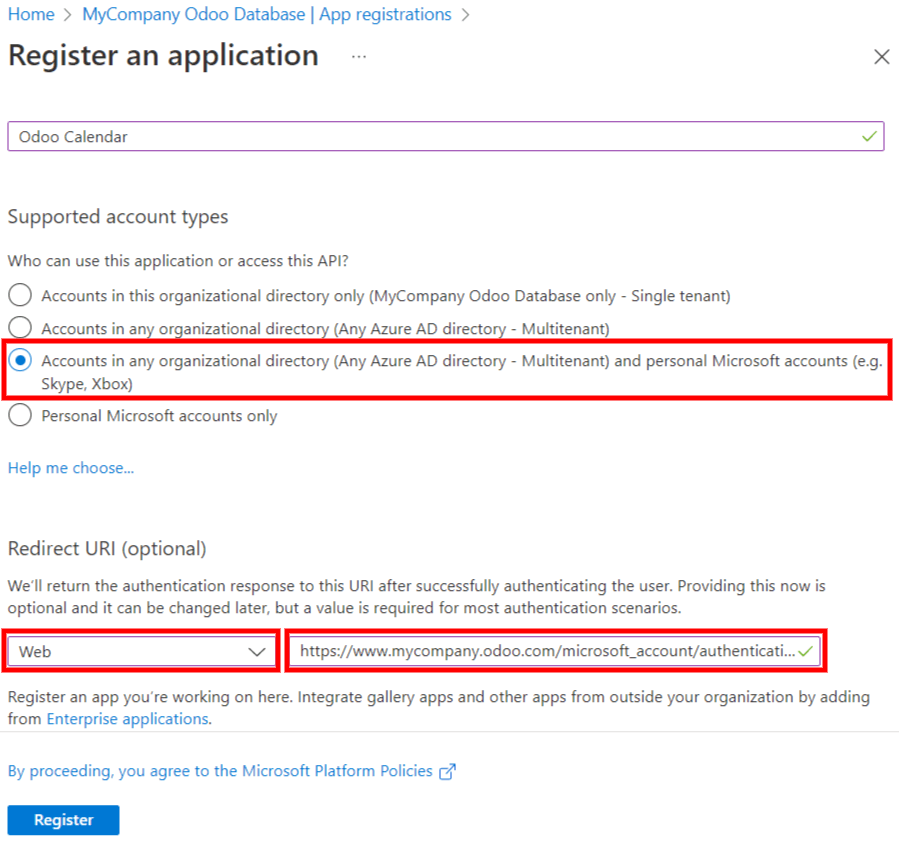
یک نام منحصر به فرد برای برنامه متصل وارد کنید.
انتخاب نوع حساب پشتیبانی شده مناسب ضروری است، در غیر این صورت برنامه متصل کار نخواهد کرد. کاربرانی که مایل به اتصال تقویم اوتلوک خود به سازمانیار هستند، باید گزینه حسابها در هر فهرست سازمانی (هر فهرست Microsoft Entra ID - چند مستاجر) و حسابهای شخصی Microsoft (به عنوان مثال Skype، Xbox) را برای انواع حساب پشتیبانی شده انتخاب کنند.
هنگام پیکربندی آدرس URL ریدایرکت، گزینه وب را از اولین منوی کشویی انتخاب کنید. سپس، شناسه URL پایگاه داده سازمانیار را به همراه /microsoft_account/authentication وارد کنید.
مثال
در Redirect URI متن https://yourdbname.tashilgostar.com/microsoft_account/authentication را تایپ کنید. البته yourdbname.tashilgostar.com را با URL اختصاصی خود جایگزین کنید.
نکته
اطمینان حاصل کنید که URL (دامنه) پایگاه داده که در URI استفاده میشود، دقیقاً با دامنهای که در پارامتر سیستم web.base.url پیکربندی شده است، یکسان باشد.
با فعال کردن حالت توسعهدهنده از مسیر وارد web.base.url شوید. سپس آن را از لیست کلید در صفحه پارامترهای سیستم انتخاب کنید.
برای کسب اطلاعات بیشتر در مورد محدودیتهای URIها، صفحه محدودیتهای URI ریدایرکت (URL پاسخ) مایکروسافت را بررسی کنید.
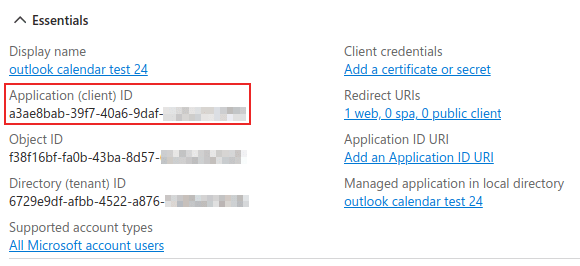
در نهایت، در صفحه رجیستر برنامه، روی دکمه Register کلیک کنید تا ثبت برنامه کامل شود. شناسه (کلاینت) برنامه ایجاد میشود. این مقدار را کپی کنید، زیرا بعداً در پیکربندی در سمت سازمانیار به آن نیاز خواهید داشت.
ایجاد رمز کلاینت
اطلاعات بعدی مورد نیاز برای تکمیل همگامسازی تقویم اوتلوک، رمز کلاینت است. کاربر باید یک رمز کلاینت اضافه کند، زیرا این کار به سازمانیار اجازه میدهد تا خود را احراز هویت کند و نیازی به تعامل از طرف کاربر نباشد. گواهینامهها اختیاری هستند.
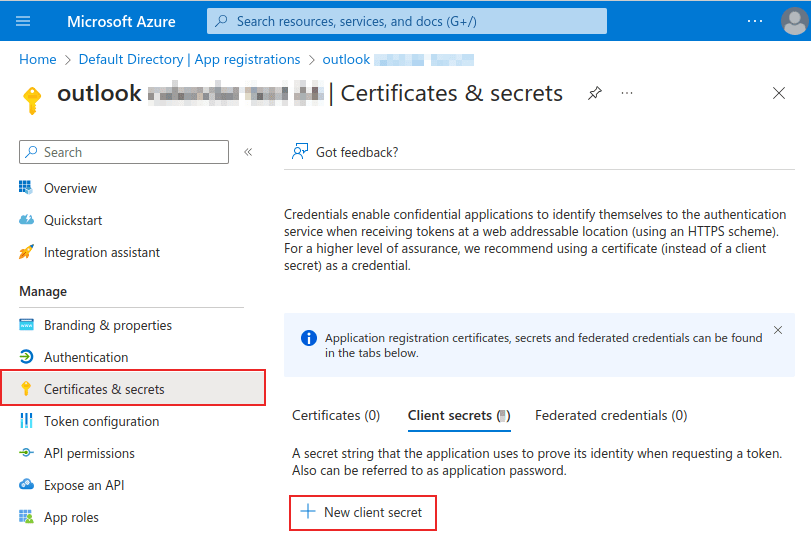
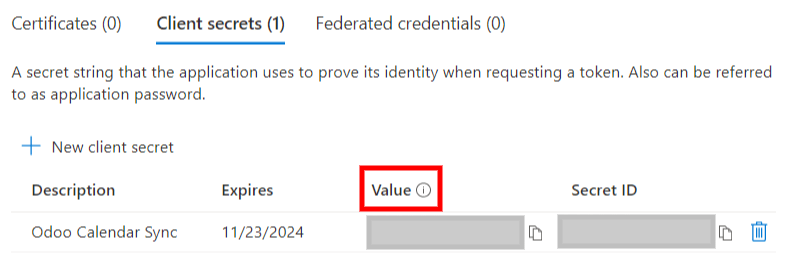
برای درج رمز کاربر، بر روی کلیک کرده و سپس + New client secret را کلیک کنید تا رمز کلاینت ایجاد شود.
در مرحله بعد، توضیحات را تایپ کنید و مشخص کنید که رمز کلاینت چه زمانی منقضی میشود. گزینههای موجود عبارتند از: 90 روز (3 ماه)، 365 روز (12 ماه)، 545 روز (18 ماه)، 730 روز (24 ماه) یا سفارشی. گزینه سفارشی به مدیر سیستم اجازه میدهد تا تاریخ شروع و پایان را تعیین کند.
در نهایت، برای افزودن رمز کلاینت، روی افزودن سطر کلیک کنید.
نکته
از آنجاییکه ریست (بازنشانی) همگامسازی مشکلات خودش را دارد، اودوو پیشنهاد میکند حداکثر تاریخ انقضای ممکن برای رمز کاربر (یعنی 24 ماه) تعیین شود، و نیازی به همگامسازی زود هنگام نباشد.
برای استفاده در بخش بعدی، مقدار را کپی کنید.
هشدار
مقادیر رمز کلاینت را نمیتوان مشاهده کرد، مگر بلافاصله پس از ایجاد. حتماً هنگام ایجاد، قبل از خروج از صفحه، رمز را ذخیره کنید.
پیکربندی در سمت سازمانیار
In the Odoo database, go to , and tick the checkbox beside the Outlook Calendar setting. Remember to click Save to implement the changes.
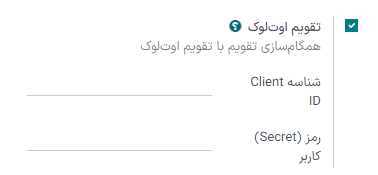
From the Microsoft Azure portal, under the Overview section of the application, copy the Application (Client) ID, if it has not already been copied, and paste it into the Client ID field in Odoo.
مقدار (رمز کلاینت) که قبلاً به دست آمده است را کپی کنید و در سازمانیار در فیلد رمز کلاینت قرار دهید.
بعد از انجام تنظیمات و ورود مقادیر، در صفحه دوباره ذخیره را بزنید.
همگامسازی با اوتلوک
هشدار
اودوو شدیداً توصیه میکند همگامسازی تقویم اوتلوک در پایگاه داده تست و با استفاده از آدرس ایمیل تست (که برای اهداف دیگری استفاده نمیشود) انجام شود و بعداً نسبت به همگامسازی تقویم اوتلوک با پایگاه داده زیربار اقدام شود.
اگر قبل از همگامسازی با تقویم اوتلوک، کاربر دارای رویداد گذشته، فعلی یا آینده در سازمانیار باشد، اوتلوک رویدادهای دریافتی از تقویم سازمانیار را رویدادهای جدید تلقی میکند، و باعث میشود به تمام شرکتکنندگان رویداد ایمیل اطلاعرسانی ارسال شود.
برای جلوگیری از ارسال ایمیل ناخواسته به شرکتکنندگان رویدادهای قبلی، فعلی و آینده، کاربر باید قبل از اولین همگامسازی، رویدادها را از تقویم سازمانیار به تقویم اوتلوک وارد کند، رویدادها را از سازمانیار حذف کند، و سپس همگامسازی را شروع کند.
حتی بعد از همگامسازی تقویم سازمانیار با اوتلوک، هرگاه رویدادی ویرایش شود (ایجاد، حذف، خروج از بایگانی، و یا حتی تغییر تاریخ و زمان)، بدون استثناء به تمام شرکتکنندگان رویداد اطلاعرسانی ارسال خواهد شد. این محدودیت را نمیتوان در سمت سازمانیار برطرف کرد.
به صورت خلاصه، پس از اینکه کاربر تقویم اوتلوک خود را با تقویم سازمانیار همگام کرد:
ایجاد رویداد جدید در سازمانیار باعث میشود اوتلوک به تمام شرکتکنندگان رویداد دعوتنامه ارسال کند.
حذف رویداد از سازمانیار باعث میشود اوتلوک به تمام شرکتکنندگان رویداد ایمیل لغو ارسال کند.
خارج کردن یک رویداد از بایگانی در سازمانیار، باعث میشود اوتلوک به تمام شرکتکنندگان رویداد دعوتنامه ارسال کند.
بایگانی کردن رویداد در سازمانیار باعث میشود اوتلوک به تمام شرکتکنندگان رویداد اطلاعیه لغو ارسال کند.
افزودن مخاطب جدید به رویداد باعث میشود اوتلوک به تمام شرکتکنندگان رویداد دعوتنامه ارسال کند.
حذف مخاطب از رویداد باعث میشود اوتلوک به تمام شرکتکنندگان رویداد اطلاعیه لغو ارسال کند.
همگامسازی تقویم با اوتلوک
در پایگاه داده سازمانیار، برنامه تقویم را باز کنید و روی دکمه همگامسازی اوتلوک در سمت چپ صفحه، زیر تقویم ماهانه کلیک کنید.
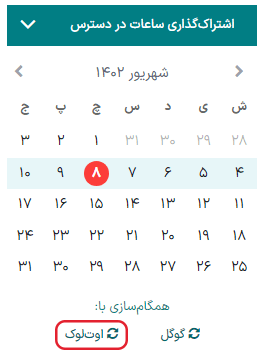
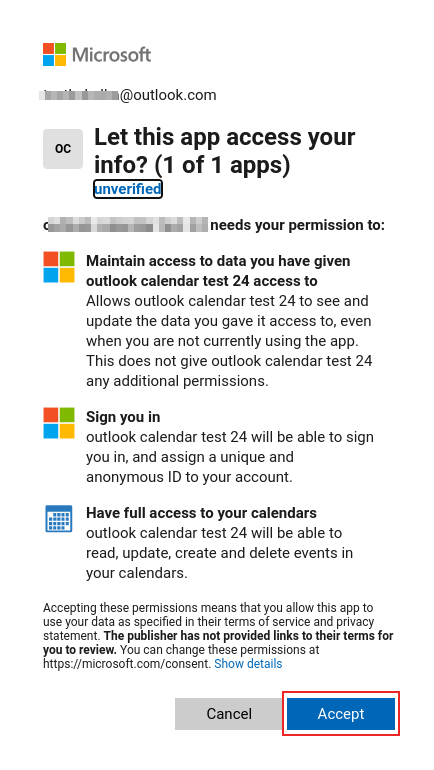
همگامسازی یک فرآیند دو طرفه است، به این معنی که رویدادها در هر دو حساب (اوتلوک و سازمانیار) هماهنگ میشوند. صفحه به صفحه ورود به سیستم مایکروسافت هدایت میشود و از کاربر خواسته میشود که اگر قبلاً وارد نشده باشد به حساب خود وارد شود. در نهایت، تأیید کنید تا مجوزهای مورد نیاز صادر شوند.
توجه
تمام کاربرانی که میخواهند از همگامسازی استفاده کنند، تنها کافیست تقویم خود را با اوتلوک همگام کنند. پیکربندی حساب مایکروسافت آژور فقط یکبار انجام میشود، چراکه Client ID و Client Secret (شناسه مشتری و رمز حساب) در Microsoft Entra ID منحصر به فرد و نماینده سازمان است، که به کاربر اجازه میدهد یک واقعه از خدمات ابری مایکروسافت را برای کاربران داخلی و خارجی خود مدیریت کند.
همچنین ببینید
عیبیابی همگامسازی
ممکن است گاهی اوقات حساب تقویم اوتلوک به درستی با سازمانیار همگام نشود. مشکلات همگامسازی را میتوان در لاگهای پایگاه داده مشاهده کرد.
در این موارد، حساب نیاز به عیبیابی دارد. با استفاده از دکمه بازنشانی حساب میتوان یک بازنشانی انجام داد، که از طریق قابل دسترسی است. سپس، کاربری را که میخواهید تقویم را برایش تغییر دهید انتخاب کنید و روی تب برنامه تقویم کلیک کنید.
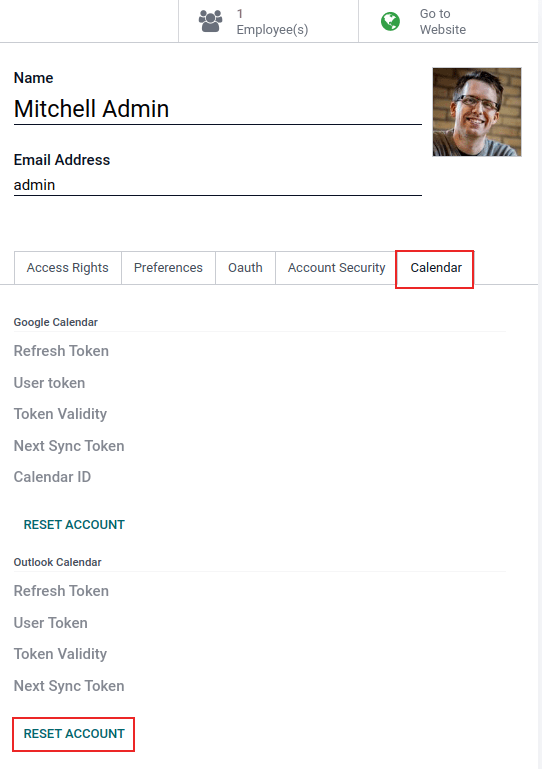
در مرحله بعد، زیر تقویم مورد نظر، روی بازنشانی حساب کلیک کنید.
گزینههای بازنشانی
گزینههای بازنشانی زیر برای عیبیابی همگامسازی تقویم اوتلوک مایکروسافت با سازمانیار در دسترس هستند:
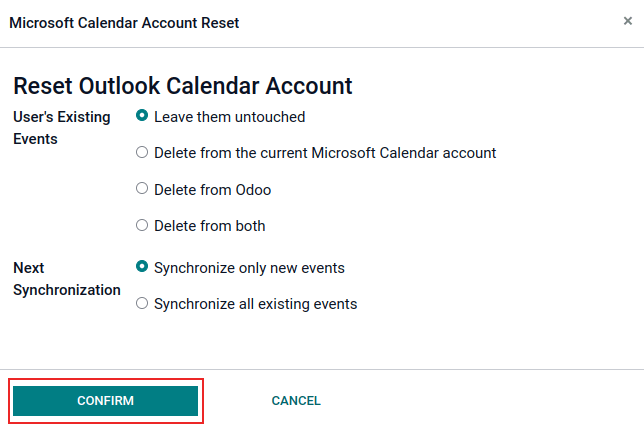
رویدادهای موجود کاربر:
دست نخورده بمانند: تغییری در رویدادها اعمال نشود.
حذف از حساب تقویم مایکروسافت فعلی: رویدادها را از تقویم اوتلوک مایکروسافت حذف میکند.
حذف از سازمانیار: رویدادها را از برنامه تقویم سازمانیار حذف کنید.
حذف از هر دو: رویدادها را از تقویم اوتلوک مایکروسافت و برنامه تقویم سازمانیار حذف میکند.
همگامسازی بعدی:
همگامسازی فقط رویدادهای جدید: رویدادهای جدید را در تقویم اوتلوک مایکروسافت یا برنامه تقویم سازمانیار، همگامسازی میکند.
همگامسازی همه رویدادهای موجود: همه رویدادها را در تقویم اوتلوک مایکروسافت یا برنامه تقویم سازمانیار، همگامسازی میکند.
پس از انتخاب، روی تأیید کلیک کنید تا رویدادهای کاربر و همگامسازی تقویم اصلاح شود.